
The sun is high, the grass is green, and the grill is calling your name. You’ve got a yard full of friends, family, and kids chasing bubbles.
The last thing you need is a complicated menu that traps you in the kitchen.
You need food that feels like a hug, recipes you can scale up without sweat, and flavors that make everyone grab a second plate.
This collection of backyard bbq picnic recipes for a crowd does exactly that. No fancy tools.
No hard-to-find ingredients. Just honest, big-batch cooking that lets you enjoy the party, too.
I’ve made every single one of these dishes for gatherings of 10, 20, and even 50 people.
They hold up.
They travel well.
And they bring the kind of happy hum you only get when bellies are full and smiles are wide.

Why These Backyard BBQ Picnic Recipes Work So Well for a Crowd
When you’re feeding a big group, you need more than just tasty food. You need smart recipes.
The backyard bbq picnic recipes for a crowd below share a few secrets. Most of them use low-cost ingredients that still taste like a million bucks.
They lean on bold marinades, smoky heat, and bright, tangy finishes—flavors that don’t fade after sitting on a picnic table.
Almost every dish can be prepped ahead, so you’re not stuck frantically chopping while guests arrive.
And each recipe gives you a Low and a High option. The Low batch feeds 8 to 10 hungry folks.
The High batch feeds 16 to 20. You get clear times for both, so there’s no guesswork.
Grab your cooler, fire up the charcoal, and let’s build a spread that makes your backyard the best seat in town.
The Grilled Mains: Backyard BBQ Picnic Recipes to Feed Everyone
Nothing says backyard picnic like the sizzle of meat hitting a hot grate.
These main-dish backyard bbq picnic recipes for a crowd give you classic flavors with a few fun twists.
They’re designed for a standard 22-inch kettle grill, a larger gas grill, or even a portable flat-top.
I’ll note where a good meat thermometer (I love the instant-read kind that gives you a reading in two seconds) saves the day.
And if you don’t already own a pair of long-handled tongs and a sturdy grill basket, they’re game changers for crowd cooking.
Sticky-Sweet BBQ Chicken Drumsticks

Chicken drumsticks are the ultimate picnic hero. They’re cheap, hard to overcook, and kids grab them like treasure.
I love this recipe because the sauce does double duty: it’s a marinade and a glaze. The sticky, slightly charred skin traps moisture inside, so every bite is juicy.
Best for: laid-back afternoons when you want to sit and chat while the grill works.
Serve: 8-10 (Low) / 16-20 (High) | Prep Time: 15 min / 20 min | Cook Time: 35 min / 45 min | Total Time: 50 min / 1 hr 5 min
Ingredients
*For Low Batch (8-10 drumsticks)*
- 3 lbs chicken drumsticks (about 10 pieces)
- 1 cup your favorite BBQ sauce (hickory or sweet honey works great)
- 2 tablespoons apple cider vinegar
- 1 tablespoon olive oil
- 1 teaspoon garlic powder
- 1 teaspoon smoked paprika
- ½ teaspoon salt
- ¼ teaspoon black pepper
*For High Batch (16-20 drumsticks)*
- 6 lbs chicken drumsticks (about 20 pieces)
- 2 cups BBQ sauce
- ¼ cup apple cider vinegar
- 2 tablespoons olive oil
- 2 teaspoons garlic powder
- 2 teaspoons smoked paprika
- 1 teaspoon salt
- ½ teaspoon black pepper
How To Make (Step by Step)
Grab two zone heat. Light your charcoal or set your gas grill to medium-high on one side and low on the other. You want a hot zone and a cool safety zone. For the high batch, make sure you have plenty of unlit coals to replenish if your cook goes long.
Mix the sauce. In a large bowl, whisk the BBQ sauce, vinegar, oil, garlic powder, smoked paprika, salt, and pepper. Remove ¼ cup (low) or ½ cup (high) of the sauce and set it aside for glazing later. Never reuse marinade that touched raw chicken unless you boil it first.
Coat the drumsticks. Pat the chicken dry with paper towels. Toss all drumsticks in the remaining sauce until they’re fully coated. Let them sit at room temperature for 15 minutes while the grill heats up. If you have time, you can marinate them in the fridge for up to 4 hours.
Grill over indirect heat. Place the drumsticks on the cooler side of the grill. Close the lid and cook for 20 minutes (low) or 25 minutes (high), turning once. This gentle heat cooks the meat through without burning the skin.
Crisp and glaze over direct heat. Move the drumsticks to the hot side. Grill 3 to 4 minutes per side, brushing with the reserved sauce. You want a deep mahogany color and an internal temperature of 175°F. A quick-read thermometer makes this foolproof.
Rest and serve. Move the chicken to a clean platter. Let it rest 5 minutes. The juices settle, and the skin gets even stickier. Serve piled high on a rustic wooden board—no fancy garnish needed.
Juicy Smash Burgers for a Crowd
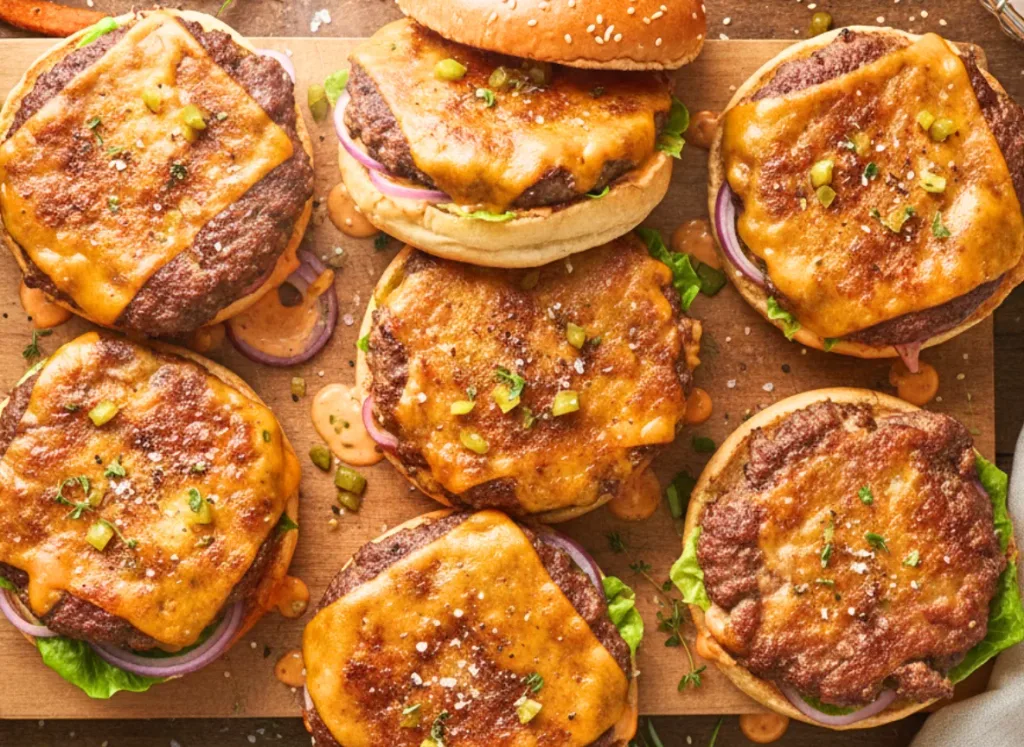
Thick pub burgers are great, but thin smash burgers rule a picnic. They cook in two minutes, develop an incredible crispy crust, and you can easily double the patty count without losing your mind.
Why I love this recipe: you don’t need a special smasher. A heavy metal spatula and a piece of parchment paper work perfectly.
Best for: a hungry crowd that can’t wait long and loves building their own burger.
Serve: 8 patties (Low) / 16 patties (High) | Prep Time: 15 min / 20 min | Cook Time: 10 min / 20 min | Total Time: 25 min / 40 min
Ingredients
For Low Batch (8 patties)
- 2 lbs ground beef (80/20 chuck is ideal)
- 1 teaspoon salt
- ½ teaspoon black pepper
- ½ teaspoon garlic powder
- 8 slices American cheese
- 8 soft burger buns, split
- Butter for toasting buns
- Toppings: sliced pickles, thin onion rings, ketchup, mustard
For High Batch (16 patties)
- 4 lbs ground beef
- 2 teaspoons salt
- 1 teaspoon black pepper
- 1 teaspoon garlic powder
- 16 slices American cheese
- 16 burger buns
- Butter for buns
- Toppings scaled up
How To Make (Step by Step)
Shape the beef balls. Divide the meat into 4-ounce portions. Gently roll them into loose balls—don’t pack them tight. Tight meat makes tough burgers. Place the balls on a tray. If you’re making the high batch, do this in two trays so you can grab fast.
Heat a flat surface. A cast-iron griddle or a flat-top grill attachment (a fantastic addition to your grill) works best. Get it screaming hot over medium-high heat. You should barely be able to hold your hand 6 inches above it.
Smash and season. Place a ball on the hot surface. Immediately lay a small square of parchment paper over it and press down hard with a heavy spatula for 10 seconds. Peel off the paper. The patty should be thin, with ragged edges. Sprinkle salt, pepper, and garlic powder on the raw side.
Flip once. Cook 90 seconds. You’ll see juices pool on top. Scrape under the crust carefully and flip. Immediately lay a slice of cheese on the cooked side. Cook another 60 seconds. The cheese melts into a gooey blanket.
Toast the buns. While burgers cook, spread a little butter on the cut sides of the buns. Place them face down on the cooler edge of the griddle for 30 seconds until golden. Toasting keeps the bun from getting soggy.
Assemble fast. Stack two patties per bun if you like a double smash. Pile on pickles, onions, and a squirt of sauce. Serve immediately on a large tray lined with parchment. The steam from the hot patties softens the bun just right.
Grilled Herb and Sausage Skewers
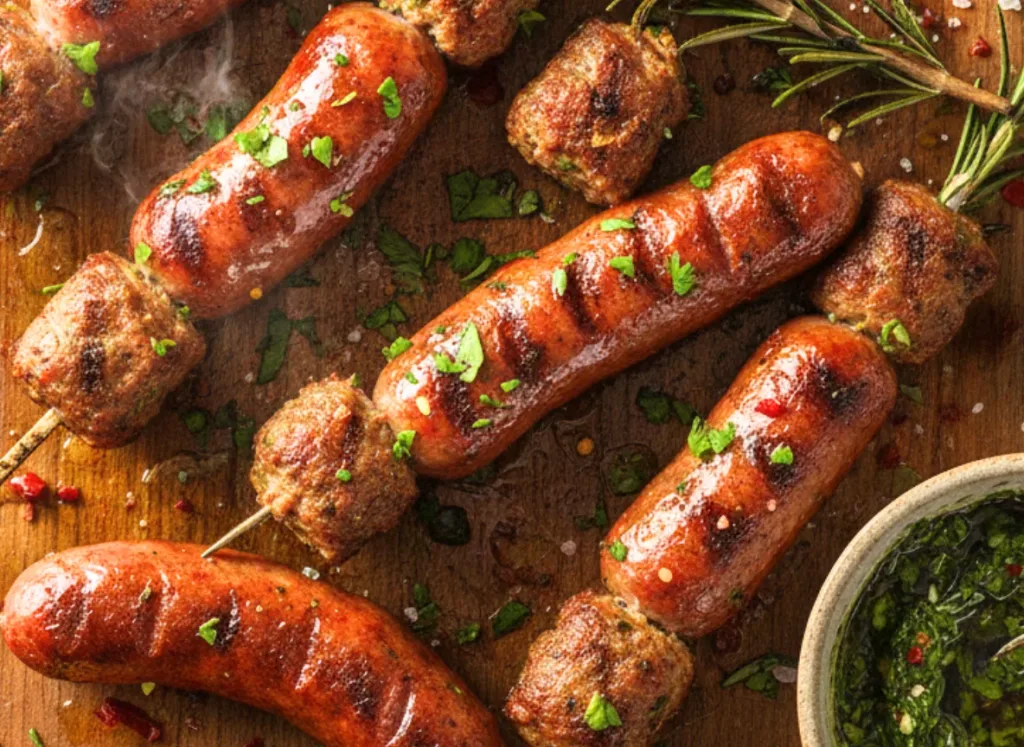
These skewers bring color and big flavor without a lot of knife work. I love that you can prep the whole tray the night before and just throw them on the grill when guests start eyeing the food table.
Smoky sausage, sweet bell peppers, and onion chunks char beautifully.
A fast herb oil ties everything together.
Best for: a flexible main that also doubles as a hearty appetizer.
Serve: 8 skewers (Low) / 16 skewers (High) | Prep Time: 25 min / 35 min | Cook Time: 12 min / 16 min | Total Time: 37 min / 51 min
Ingredients
For Low Batch (8 skewers)
- 1 lb smoked sausage (kielbasa or andouille), cut into 1-inch thick coins
- 2 bell peppers (1 red, 1 yellow), cut into 1-inch squares
- 1 large red onion, cut into chunks
- 2 tablespoons olive oil
- 1 tablespoon chopped fresh rosemary (or 1 teaspoon dried)
- 1 teaspoon dried oregano
- ½ teaspoon salt
- ¼ teaspoon red pepper flakes (optional)
- Wooden or metal skewers
For High Batch (16 skewers)
- 2 lbs smoked sausage
- 4 bell peppers (mix colors)
- 2 large red onions
- ¼ cup olive oil
- 2 tablespoons fresh rosemary
- 2 teaspoons dried oregano
- 1 teaspoon salt
- ½ teaspoon red pepper flakes
How To Make (Step by Step)
Soak the skewers. If you’re using wooden skewers, soak them in water for at least 30 minutes. This stops them from burning to a crisp. For the high batch, soak two bundles. Metal skewers skip this step entirely and are a smart reusable buy.
Make the herb oil. In a large bowl, stir together the olive oil, rosemary, oregano, salt, and red pepper flakes. The oil will wake up the dried herbs and carry flavor into every bite.
Toss and thread. Add the sausage, peppers, and onion to the bowl. Toss with your hands until every piece glistens. Thread the ingredients onto skewers, alternating colors. Leave a tiny gap between pieces so heat can circulate and cook the veggies through.
Grill over medium heat. Place skewers on a grill set to medium (around 375°F to 400°F). Cook for 6 minutes (low) or 8 minutes (high), turning once halfway. You want light char marks on the peppers and a deeper color on the sausage.
Check for doneness. Sausage is already cooked, so you’re just heating it through and charring the edges. Peppers should soften but still have a little crunch. If you like softer veggies, move skewers to a cooler zone and close the lid for 3 extra minutes.
Serve with a drizzle. Slide the contents off the skewers onto a big platter. Drizzle any leftover herb oil from the bowl over the top. Serve with crusty bread and a swipe of whole-grain mustard.
Easy Pulled Pork for Sandwiches
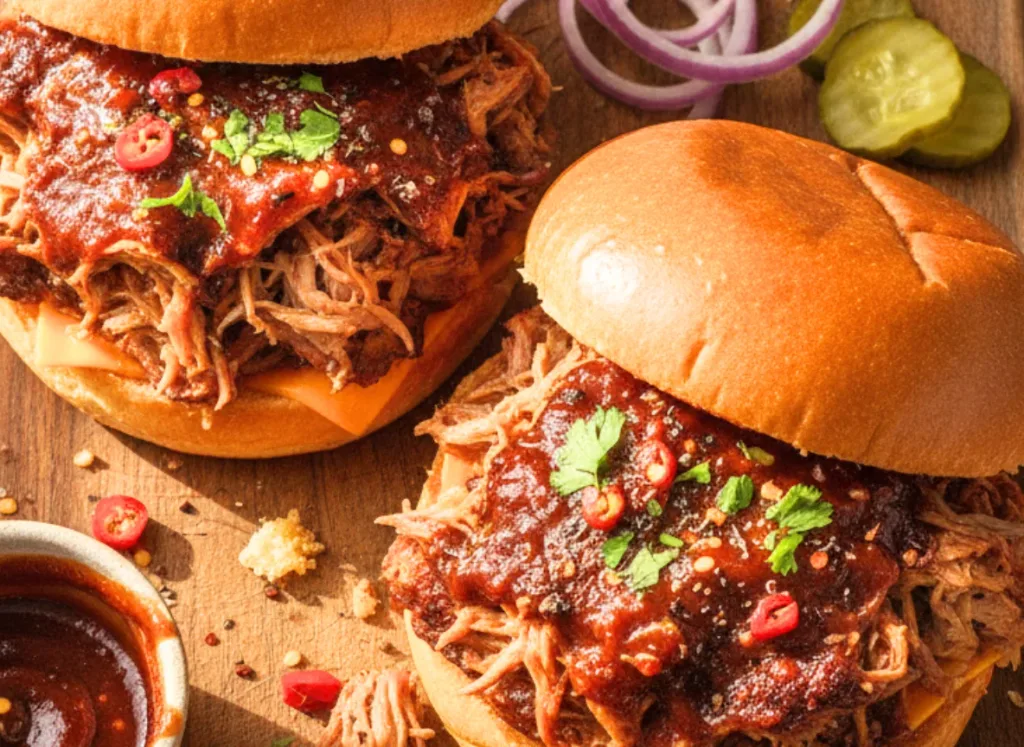
Pulled pork is a true crowd champion. But standing over a smoker for 10 hours isn’t always possible.
That’s why this recipe gives you two paths: a slow cooker for set-it-and-forget-it ease, and an Instant Pot (an absolute lifesaver when you forgot to start the meat early) for a fast, tender result.
I love the tangy vinegar mop and the way the pork shreds into silky strands.
Best for: feeding a big group on a budget and letting everyone pile buns sky-high.
Serve: 8-10 (Low) / 16-20 (High) | Prep Time: 15 min / 20 min | Cook Time: 8 hrs (slow cooker Low) or 1 hr 15 min (pressure cooker High) / 10 hrs (slow cooker High batch) or 1 hr 45 min (pressure cooker High) | Total Time: 8 hrs 15 min to 10 hrs (slow) / 1 hr 35 min to 2 hrs 5 min (pressure)
Ingredients
*For Low Batch (8-10 sandwiches)*
- 4 lbs bone-in pork shoulder (Boston butt)
- 1 tablespoon brown sugar
- 1 tablespoon smoked paprika
- 2 teaspoons salt
- 1 teaspoon black pepper
- 1 teaspoon garlic powder
- ½ cup apple cider vinegar
- ½ cup water
- 8-10 soft hamburger buns
- Coleslaw for topping
*For High Batch (16-20 sandwiches)*
- 8 lbs pork shoulder (may need two smaller roasts)
- 2 tablespoons brown sugar
- 2 tablespoons smoked paprika
- 1 tablespoon + 1 teaspoon salt
- 2 teaspoons black pepper
- 2 teaspoons garlic powder
- 1 cup apple cider vinegar
- 1 cup water
- 16-20 buns
- Coleslaw for topping
How To Make (Step by Step)
Trim and season. Trim the pork shoulder of any thick, hard fat cap, leaving a thin layer for flavor. In a small bowl, mix the brown sugar, paprika, salt, pepper, and garlic powder. Rub this mixture all over the meat, pressing it into every crease. Don’t rinse the rub—it’s the bark maker.
Choose your cooking method. For the slow cooker: place the seasoned pork in the slow cooker, pour vinegar and water around the sides, cover, and cook on LOW for 8 hours (low batch) or 10 hours (high batch, or until fork-tender). For the Instant Pot: add the vinegar and water, lock the lid, set the valve to sealing, and cook on high pressure for 60 minutes (low batch) or 75 minutes (high batch). Let the pressure release naturally for 15 minutes, then quick-release the rest.
Check for tenderness. The pork is ready when a fork slides in like it’s room-temperature butter and the bone wiggles free. If it resists, cook another 30 minutes and check again. The high batch may need an extra 20 minutes in the Instant Pot if the pieces are crowded.
Shred and moisten. Transfer the meat to a large baking dish or rimmed sheet pan. Use two forks to pull the pork apart. Fish out any large globs of fat that didn’t render. Skim excess fat from the cooking liquid, then pour about 1 cup (low) or 2 cups (high) of the liquid back over the shredded meat. Toss. This is where the magic happens—the meat soaks up all that tangy, smoky juice.
Keep warm and serve. Pile the pulled pork on a platter or in a slow cooker set to WARM. Set out soft buns, a big bowl of coleslaw, and a bottle of extra BBQ sauce. Let folks build their own sandwich. A bag of kettle-cooked potato chips on the side doesn’t hurt.
Sides & Salads: Perfect Backyard BBQ Picnic Recipes for a Crowd
No picnic spread is complete without a table full of sides that hold up in the heat.
These backyard bbq picnic recipes for a crowd avoid mayo-heavy disasters by using smart dressings and sturdy ingredients.
Each one can be made hours in advance, so you’re calm when the doorbell rings.
A set of large mixing bowls and a reliable cooler are your best friends here.
Loaded Baked Potato Salad
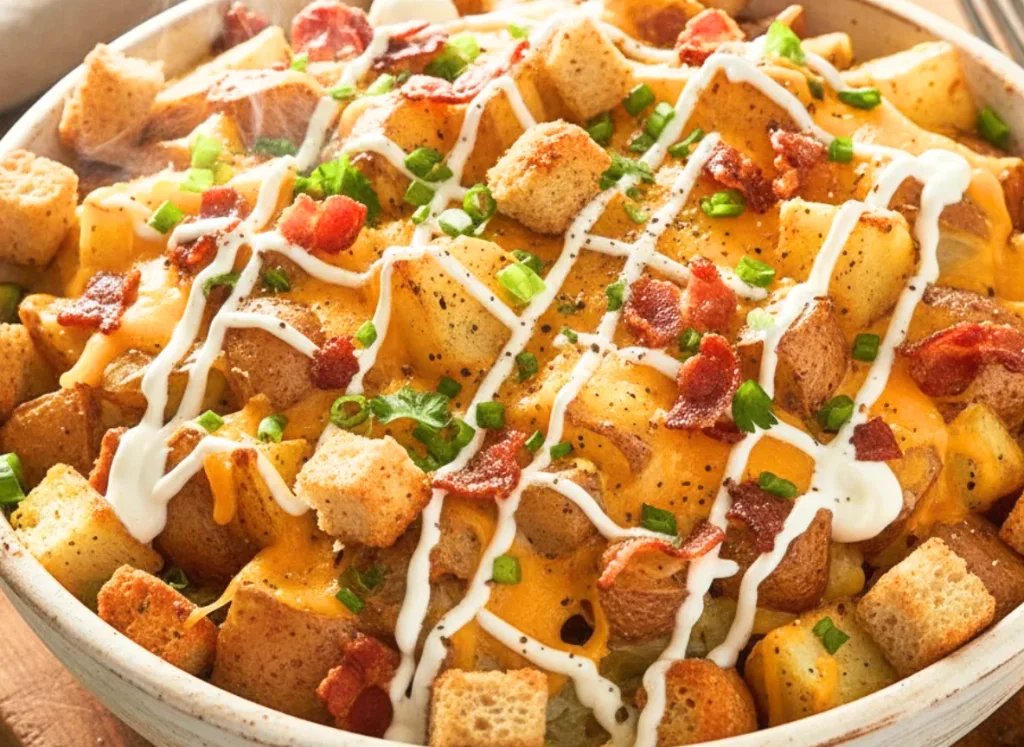
Regular potato salad is fine. This one is a showstopper. It takes everything you love about a fully dressed baked potato—crispy bacon, sharp cheddar, green onion, sour cream—and turns it into a scoopable salad.
I love that there’s no peeling required, and the red potato skins add a nice earthy chew.
Best for: a hearty side that doubles as a comfort food hug.
Serve: 8-10 (Low) / 16-20 (High) | Prep Time: 20 min / 30 min | Cook Time: 20 min / 30 min | Total Time: 40 min / 1 hr
Ingredients
*For Low Batch (8-10 servings)*
- 3 lbs red potatoes, cut into 1-inch chunks
- 1 teaspoon salt (for boiling water)
- ½ cup sour cream
- ¼ cup mayonnaise
- 1 tablespoon apple cider vinegar
- 1 cup shredded sharp cheddar cheese
- 6 slices bacon, cooked and crumbled
- 4 green onions, thinly sliced
- ½ teaspoon black pepper
- Salt to taste
*For High Batch (16-20 servings)*
- 6 lbs red potatoes
- 2 teaspoons salt for water
- 1 cup sour cream
- ½ cup mayonnaise
- 2 tablespoons apple cider vinegar
- 2 cups shredded cheddar
- 12 slices bacon
- 8 green onions
- 1 teaspoon black pepper
How To Make (Step by Step)
Boil the potatoes. Place potato chunks in a large pot and cover with cold water by an inch. Add 1 teaspoon (low) or 2 teaspoons (high) salt. Bring to a boil, then reduce to a simmer. Cook until fork-tender, about 12-15 minutes. Don’t overcook—you want them to hold their shape.
Drain and cool slightly. Drain the potatoes in a colander. Let them steam dry for 5 minutes. You want them warm but not piping hot when they meet the dressing; they’ll soak up more flavor.
Mix the creamy base. In a huge bowl, whisk together the sour cream, mayonnaise, and apple cider vinegar. The vinegar cuts the richness just enough. It’s a tiny detail that makes a big difference.
Fold everything together. Add the warm potatoes to the bowl. Sprinkle the cheddar, bacon, green onions, and pepper over the top. Use a big spoon to fold gently—you want some chunks to stay intact and some to get a little mashed and creamy. Taste and add salt if needed. Bacon already brings salt, so go easy.
Chill or serve room temp. This potato salad tastes even better after an hour in the fridge. The flavors marry and mellow. Let it sit on the picnic table for up to 2 hours. After that, tuck it back into a cooler with ice packs to keep safe.
Creamy Coleslaw with a Tangy Kick
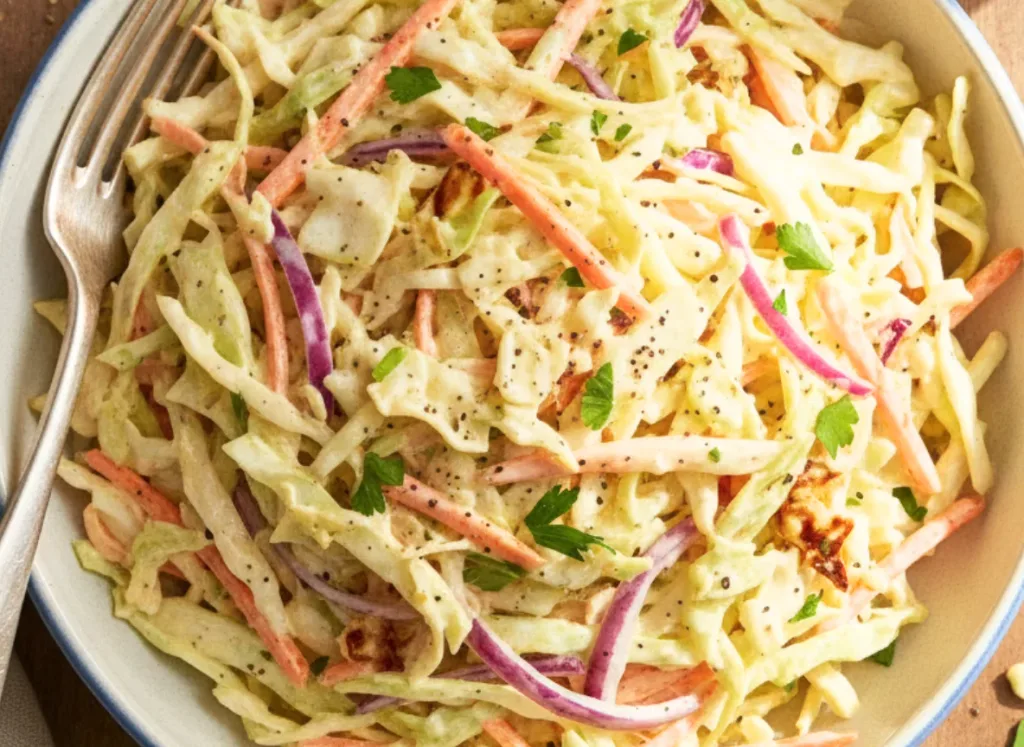
A good coleslaw is crunchy, bright, and just creamy enough to cling to the cabbage. This isn’t a soupy slaw.
The dressing uses a touch of buttermilk for tang and celery seed for that classic deli flavor.
I love how it cuts through rich pulled pork or a juicy burger.
Best for: a make-ahead side that stays crisp for hours.
Serve: 8-10 (Low) / 16-20 (High) | Prep Time: 15 min / 25 min | Cook Time: 0 min | Total Time: 15 min / 25 min
Ingredients
*For Low Batch (8-10 servings)*
- 1 medium green cabbage (about 2 lbs), finely shredded
- 2 medium carrots, shredded
- ½ cup mayonnaise
- 2 tablespoons buttermilk
- 1 tablespoon apple cider vinegar
- 1 teaspoon sugar
- ½ teaspoon celery seed
- ½ teaspoon salt
- ¼ teaspoon black pepper
*For High Batch (16-20 servings)*
- 2 medium green cabbages (about 4 lbs total)
- 4 medium carrots
- 1 cup mayonnaise
- ¼ cup buttermilk
- 2 tablespoons apple cider vinegar
- 2 teaspoons sugar
- 1 teaspoon celery seed
- 1 teaspoon salt
- ½ teaspoon black pepper
How To Make (Step by Step)
Shred the veggies. Slice the cabbage as thin as you can with a sharp chef’s knife, or use a food processor with the slicing disc. Grate the carrots. Toss cabbage and carrots together in a gigantic mixing bowl. For the high batch, you might need two bowls or a clean 5-gallon bucket—no shame in that.
Whisk the dressing. In a separate bowl, combine the mayonnaise, buttermilk, vinegar, sugar, celery seed, salt, and pepper. Whisk until smooth and pourable. Taste it. It should be zippy and a little sweet. Adjust salt or vinegar to your liking.
Toss and massage. Pour the dressing over the cabbage mix. Use tongs or clean hands to toss really well. Then, take a minute to squeeze and massage the cabbage gently. This softens the fibers slightly and helps the slaw absorb dressing without releasing a ton of water later.
Let it rest. Cover the bowl and refrigerate for at least 30 minutes. The cabbage will relax and the flavors will bloom. Before serving, give it another toss. A little pool of dressing at the bottom is normal—just stir it back in. Serve with a slotted spoon.
Summer Corn and Black Bean Salad
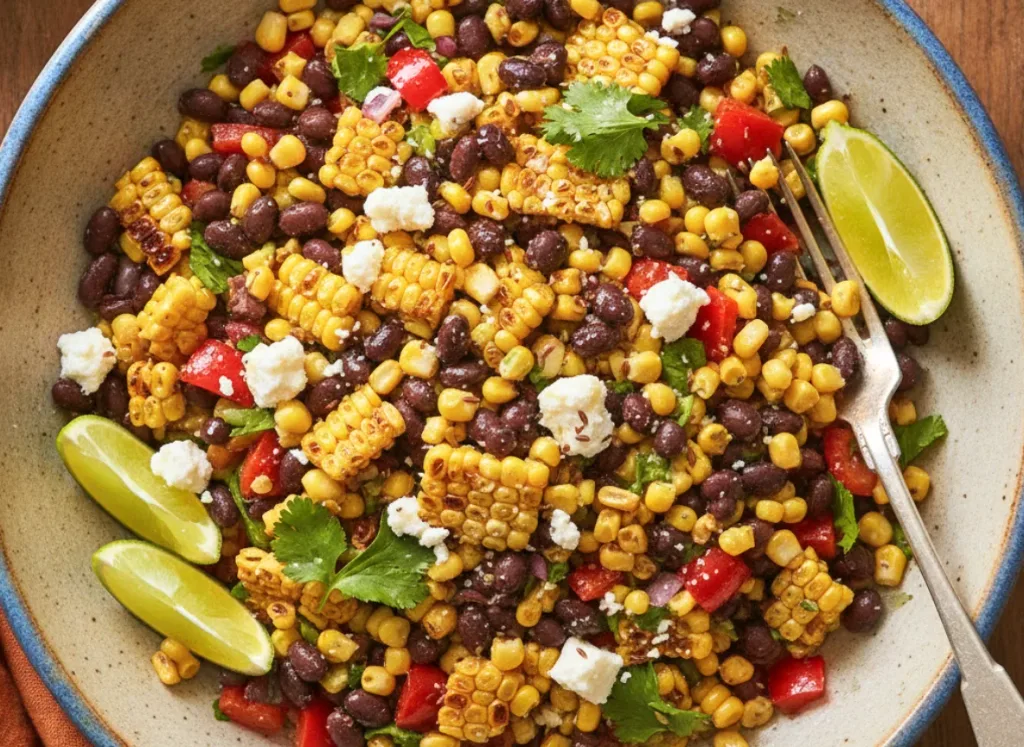
This salad screams sunshine. Sweet corn kernels, hearty black beans, and juicy cherry tomatoes come together with a lime dressing that makes everything pop.
I love it because there’s zero mayo, so it’s completely worry-free under the hot sun.
Best for: a colorful side that also works as a dip with tortilla chips.
Serve: 8-10 (Low) / 16-20 (High) | Prep Time: 20 min / 30 min | Cook Time: 10 min / 15 min | Total Time: 30 min / 45 min
Ingredients
*For Low Batch (8-10 servings)*
- 4 ears fresh corn (or 3 cups frozen corn, thawed)
- 1 can (15 oz) black beans, rinsed and drained
- 1 pint cherry tomatoes, halved
- ½ small red onion, finely diced
- 1 jalapeño, seeded and minced (optional)
- ¼ cup chopped fresh cilantro
- 3 tablespoons olive oil
- Juice of 2 limes (about ¼ cup)
- ½ teaspoon ground cumin
- ½ teaspoon salt
*For High Batch (16-20 servings)*
- 8 ears corn (or 6 cups frozen corn)
- 2 cans (15 oz each) black beans
- 2 pints cherry tomatoes
- 1 small red onion
- 1-2 jalapeños
- ½ cup cilantro
- 6 tablespoons olive oil
- Juice of 4 limes (about ½ cup)
- 1 teaspoon cumin
- 1 teaspoon salt
How To Make (Step by Step)
Char the corn. If using fresh corn, grill the ears over medium-high heat for 8-10 minutes, turning occasionally, until you see some dark char spots. Let them cool enough to handle, then cut the kernels off the cob. If using frozen corn, heat a dry skillet over high heat and cook the corn for 4-5 minutes until it’s spotty brown. A grill basket makes this step even easier.
Build the salad. In your biggest bowl, combine the corn, black beans, tomatoes, red onion, jalapeño, and cilantro. The mix is already so pretty you might pause for a picture.
Dress and toss. Whisk the olive oil, lime juice, cumin, and salt. Pour it over the salad. Toss gently so you don’t squish the tomatoes. The lime and cumin do all the heavy lifting, bringing a kind of street-corn vibe without the mess.
Let it mingle. This salad gets better the longer it sits. I like to make it at least 2 hours ahead and keep it in the cooler. The beans and corn soak up that lime dressing beautifully. Just before serving, check the salt and give it a fresh squeeze of lime if it needs a wake-up.
Classic Macaroni Salad with a Twist
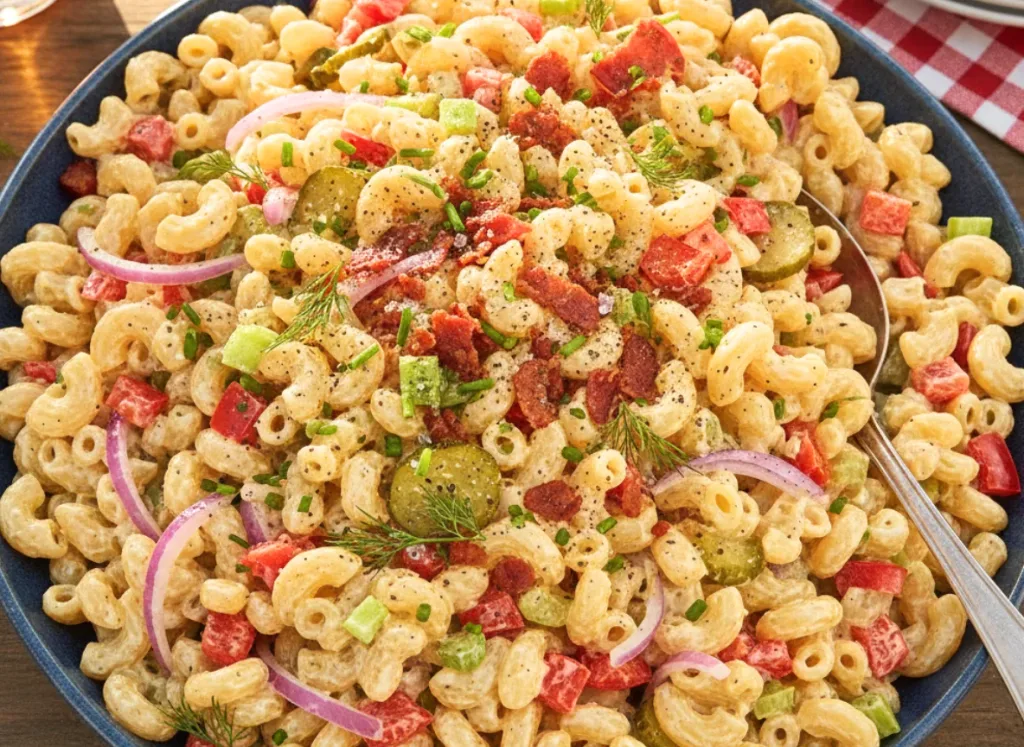
Macaroni salad is a must at any picnic, but it can be bland. My twist is a spoonful of sweet pickle relish and a dash of yellow mustard in the dressing.
It’s a tiny upgrade that makes you go, “What is that?” I love the bouncy texture of the elbow macaroni and the tiny pops of crunch from celery and bell pepper.
Best for: a nostalgic side that pleases every generation at the table.
Serve: 8-10 (Low) / 16-20 (High) | Prep Time: 15 min / 20 min | Cook Time: 8 min / 10 min | Total Time: 23 min / 30 min + chilling
Ingredients
*For Low Batch (8-10 servings)*
- 1 lb elbow macaroni
- 1 tablespoon salt for water
- ½ cup mayonnaise
- 2 tablespoons sweet pickle relish
- 1 tablespoon yellow mustard
- 1 teaspoon apple cider vinegar
- ½ cup finely diced celery (about 2 stalks)
- ½ cup finely diced red bell pepper
- 2 hard-boiled eggs, chopped
- ½ teaspoon salt
- ¼ teaspoon black pepper
- Smoked paprika for garnish
*For High Batch (16-20 servings)*
- 2 lbs elbow macaroni
- 2 tablespoons salt for water
- 1 cup mayonnaise
- ¼ cup sweet pickle relish
- 2 tablespoons yellow mustard
- 2 teaspoons apple cider vinegar
- 1 cup diced celery
- 1 cup diced red bell pepper
- 4 hard-boiled eggs
- 1 teaspoon salt
- ½ teaspoon black pepper
How To Make (Step by Step)
Cook the pasta right. Boil a large pot of salted water. The water should taste like the sea. Cook the macaroni according to the package until it’s tender but still has a little bite. Overcooked pasta turns to mush in the salad. Drain and rinse under cold water to stop the cooking. Shake the colander well.
Whip up the dressing. In a small bowl, stir together the mayonnaise, pickle relish, mustard, and apple cider vinegar. It should look pale yellow and smell a little tangy and sweet.
Combine everything. In a giant mixing bowl, toss the cooled macaroni with the celery, bell pepper, and chopped eggs. Pour the dressing over the top. Stir with a folding motion until every piece of pasta is coated. Scrape the bottom of the bowl—dressing likes to hide there.
Chill deep and season. Cover the bowl and refrigerate for at least 2 hours, or overnight. The pasta absorbs the dressing as it sits, so it might seem a bit dry right after mixing. That’s normal. Before serving, stir in a tablespoon or two of milk or extra mayo if you want it creamier. Dust the top with smoked paprika for a pop of color.
Drinks & Dessert: Refreshing Backyard BBQ Picnic Recipes
A hot day calls for a cold glass and a sweet bite. These final two backyard bbq picnic recipes for a crowd keep things simple.
No stove required for dessert.
And the drinks use big batches, so you’re not playing bartender all day.
A large beverage dispenser with a spigot changes the drink game entirely.
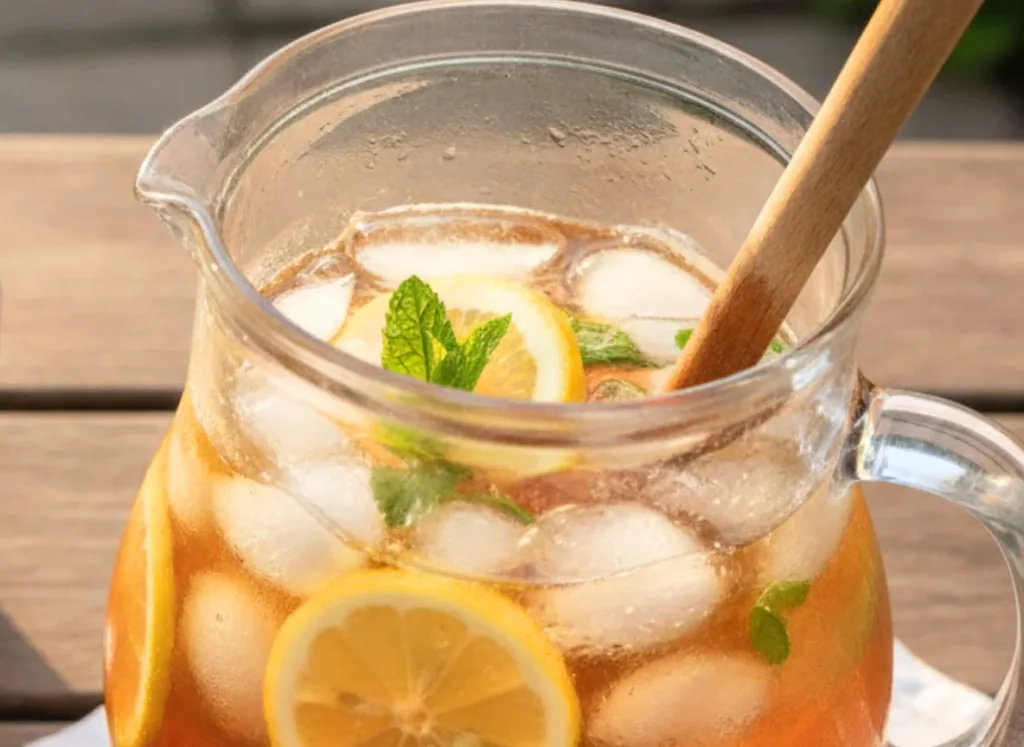
Watermelon Mint Lemonade
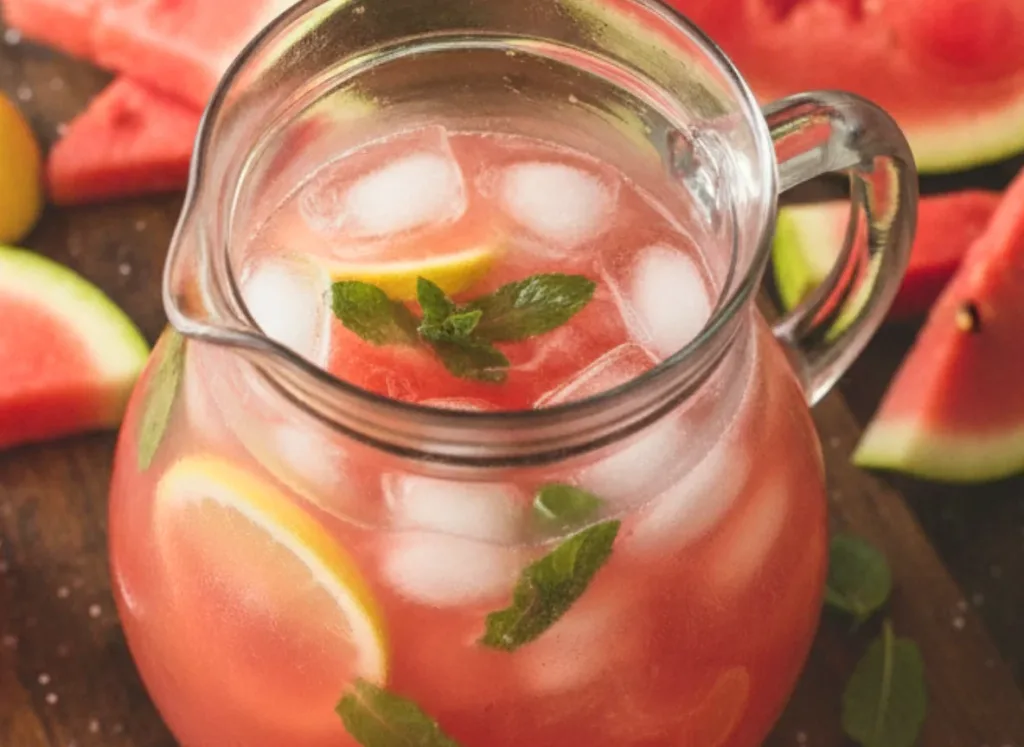
This lemonade tastes like summer in a cup. Real watermelon brings natural sweetness, so you don’t need cups of sugar.
Fresh mint keeps it cool and aromatic. I love the bright pink color—it’s a drink that makes people smile before they even taste it.
Best for: a non-alcoholic refreshment that feels special enough for a party.
Serve: 8 (Low) / 16 (High) | Prep Time: 15 min / 25 min | Cook Time: 0 min | Total Time: 15 min / 25 min
Ingredients
For Low Batch (about 1 gallon, 8 servings)
- 6 cups seedless watermelon chunks
- 1 cup freshly squeezed lemon juice (about 6-8 lemons)
- ½ cup sugar (adjust to taste)
- 4 cups cold water
- ¼ cup fresh mint leaves, plus extra for garnish
- Ice
For High Batch (about 2 gallons, 16 servings)
- 12 cups watermelon chunks
- 2 cups lemon juice (12-16 lemons)
- 1 cup sugar
- 8 cups cold water
- ½ cup mint leaves
How To Make (Step by Step)
Blend the watermelon. Place the watermelon chunks in a blender. Blend until completely smooth. You don’t need any extra liquid; the watermelon juice releases quickly. For the high batch, blend in two rounds.
Strain for smoothness. Set a fine-mesh strainer over a large pitcher or a beverage dispenser. Pour the blended watermelon through the strainer, pressing with a spoon to extract all the juice. Discard the pulp. This step removes the grit and leaves you with pure, silky watermelon juice.
Stir in lemon and sweetness. Add the fresh lemon juice and sugar to the pitcher. Stir hard until the sugar dissolves. Pour in the cold water. The color will be a gorgeous coral pink. Taste and add more sugar or lemon if your watermelon wasn’t very sweet.
Mint it up. Tear the mint leaves gently to release their oils and drop them into the pitcher. Add plenty of ice. If you’re using a dispenser, add ice to the cups, not the dispenser, so it doesn’t dilute too fast. Garnish each glass with a tiny mint sprig and a thin watermelon wedge on the rim.
Easy Iced Tea by the Gallon
A big jug of iced tea is non-negotiable at any backyard gathering. This is the simple, no-fuss way that brews strong, never gets bitter, and tastes clean.
I love it unsweetened with lemon, but I’ll give you a quick sweet tea option, too.
Best for: the easiest drink you’ll ever make that everyone asks for.
Serve: 8 (Low, 1 gallon) / 16 (High, 2 gallons) | Prep Time: 5 min / 10 min | Cook Time: 5 min / 5 min steeping | Total Time: 10 min / 15 min + cooling
Ingredients
For Low Batch (1 gallon)
- 4 family-size iced tea bags (or 12 regular black tea bags)
- 4 cups boiling water
- 4 cups cold water
- Ice
- Lemon slices
- Sugar or simple syrup, optional
For High Batch (2 gallons)
- 8 family-size tea bags (or 24 regular)
- 8 cups boiling water
- 8 cups cold water
- Ice and lemon
How To Make (Step by Step)
Steep the tea. Place the tea bags in a large heatproof pitcher. Pour the boiling water over them. Do not stir or squeeze the bags yet. Let them steep for exactly 5 minutes. Over-steeping pulls out tannins that make tea taste bitter.
Remove the bags. Lift the tea bags straight out without pressing them. Pressing releases bitter compounds. Discard them. What’s left is a dark, smooth tea concentrate.
Dilute and cool. Add the cold water. If you want sweet tea, stir in ¾ cup of sugar (low) or 1½ cups (high) while the tea is still warm so it dissolves completely. Cool the tea to room temperature, then pop it into the fridge or a cooler. Pour over ice-filled cups and add a thin lemon wheel. Keep a backup pitcher in the cooler for refills.
No-Bake S’mores Bar
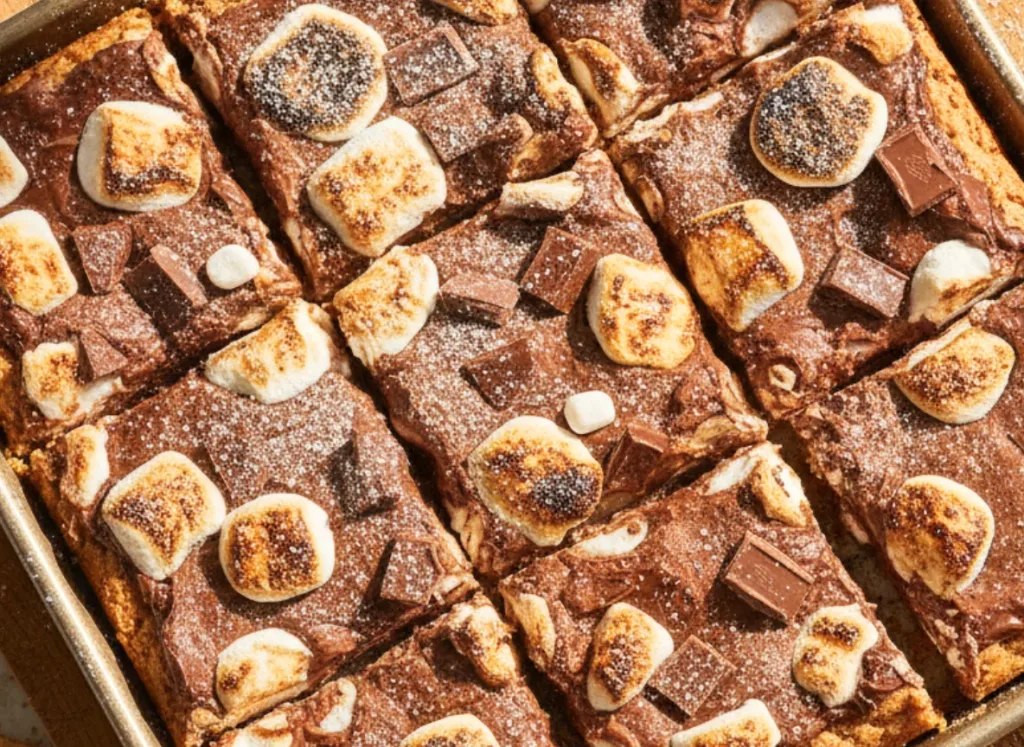
You don’t need a campfire to make s’mores that thrill a crowd. This no-bake setup uses a slow cooker or a chafing dish to keep melted chocolate warm, plus a tray of toasted marshmallows you can make on the grill in minutes.
I love how interactive this feels. Kids and adults both huddle around, building their dream stacks.
Best for: a dessert that doubles as entertainment.
Serve: 8-10 (Low) / 16-20 (High) | Prep Time: 10 min / 15 min | Cook Time: 5 min / 10 min (toasting marshmallows) | Total Time: 15 min / 25 min
Ingredients
*For Low Batch (serves 8-10)*
- 2 cups milk chocolate chips
- 1 tablespoon coconut oil (keeps chocolate smooth)
- 24 large marshmallows
- 1 box graham crackers (about 24 sheets)
- Bamboo skewers or long forks
*For High Batch (serves 16-20)*
- 4 cups milk chocolate chips
- 2 tablespoons coconut oil
- 48 large marshmallows
- 2 boxes graham crackers
- Skewers
How To Make (Step by Step)
Melt the chocolate pool. In a small slow cooker (a 1.5-quart one is perfect for the low batch) or a bowl set over a pan of barely simmering water, combine the chocolate chips and coconut oil. Stir occasionally until fully melted and glossy. Set the slow cooker to the WARM setting so the chocolate stays dippable the whole party. If you don’t have a small slow cooker, a fondue pot is a fun gadget to bring out.
Toast the marshmallows in a flash. Thread 3 marshmallows onto a skewer. Hold them over a medium grill or a gas stovetop flame, turning constantly. They’ll puff, turn golden brown, and develop a thin, crackly shell in about 30 seconds. Work in batches. Pile the toasted skewers on a platter. If you’re making the high batch, recruit a friend to help toast so you can keep up with demand.
Set up the build station. Break the graham crackers into squares and spread them on a big wooden board. Set the warm chocolate nearby with a spoon for drizzling, or let folks dip their marshmallow right into the pot. Provide napkins—lots of them.
Let everyone play. Show guests how to place a toasted marshmallow onto a graham cracker square, drizzle or dip in chocolate, and top with another cracker. The warm marshmallow softens the chocolate into a melty mess. Some folks will add a smear of peanut butter or a slice of banana. Let them. It’s a picnic, not a rule book.


Leave a Reply