
My mom had this recipe box on the counter. Stained cards with quick meals scribbled in her handwriting. No fancy ingredients. No hour-long prep times.
Just real food that got dinner done fast. These forgotten 10 minutes meals from the 90s saved us on busy weeknights. I’m talking about the era before food blogs and complicated recipes.
Back when you opened your pantry, grabbed what you had, and made something good in less time than it took to watch your favorite sitcom. My friends and I all ate these same quick meals. Tuna casseroles thrown together during commercial breaks. Eggs scrambled in the microwave before school.
Simple sandwiches that somehow tasted amazing. These recipes didn’t try to be fancy. They just worked. And honestly? They still do. I’ve brought these back into my kitchen because life is just as busy now. Maybe even more.
These quick recipes deserve another shot at your dinner table.
Why These 90s Quick Meals Still Matter Today
Life moves fast. We all need meals that keep up. These 90s recipes were built for real life. They used what people already had at home. No special trips to fancy stores. No weird ingredients you can’t pronounce.
I love these recipes because they remind me of simpler times. Back when cooking didn’t need to be Instagram-perfect. It just needed to taste good and fill bellies. These meals did exactly that.
The best part? They still work today. Maybe even better. Because now we’re all busier than ever. We need these no-fuss recipes in our lives again.

10 Minute Meals Cookbook
Stop settling for takeout. Master delicious 10-minute recipes today.
View Deal on AmazonTuna Noodle Quick Mix
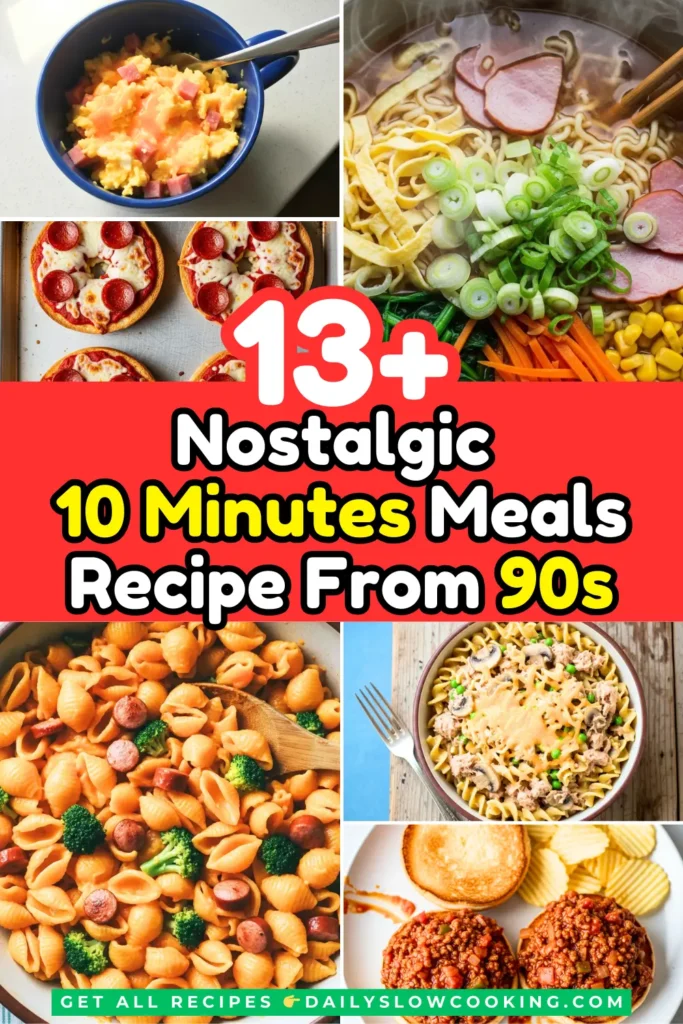
This was my mom’s go-to when she worked late. I make it for my family now because it’s just that good. You probably have everything you need right in your pantry.
It’s creamy, filling, and ready before you know it. Kids love it. Adults love it. It’s comfort food at its finest. The best part is how it comes together with minimal effort. You just boil, mix, and eat. No complicated sauces or multiple pans. This is the kind of meal that lets you relax after a long day.
I serve it with some crackers on the side, and everyone’s happy. It’s budget-friendly too, which was important in the 90s and still matters now.
Serve: 4 | Prep Time: 3 minutes | Cook Time: 7 minutes | Total Time: 10 minutes
Ingredients:
- 8 oz egg noodles
- 2 cans (5 oz each) tuna, drained
- 1 can (10.5 oz) cream of mushroom soup
- 1/2 cup frozen peas
- 1/4 cup milk
- 1/2 teaspoon garlic powder
- Salt and pepper to taste
- 1/2 cup shredded cheddar cheese (optional)
How To Make:
Boil the Noodles – Fill a large pot with water and bring it to a boil over high heat. Add the egg noodles and cook them for 5-6 minutes until they’re soft but not mushy. Drain them in a colander and set aside.
Warm the Mix – While noodles cook, pour the cream of mushroom soup into a large skillet over medium heat. Add the milk and stir until smooth and warm, about 1 minute.
Add the Protein – Open both cans of tuna and drain all the water out. Break up the tuna with a fork and add it to the soup mixture. Stir everything together.
Toss in Vegetables – Add the frozen peas directly to the skillet. No need to thaw them first. Sprinkle in the garlic powder, salt, and pepper. Stir well.
Combine Everything – Add your drained noodles to the skillet with the tuna mixture. Use a spoon or spatula to mix everything together until the noodles are coated with the creamy sauce. If you want cheese, sprinkle it on top now and stir until melted.
Serve Hot – Spoon the tuna noodle mix into bowls and serve right away while it’s nice and warm.
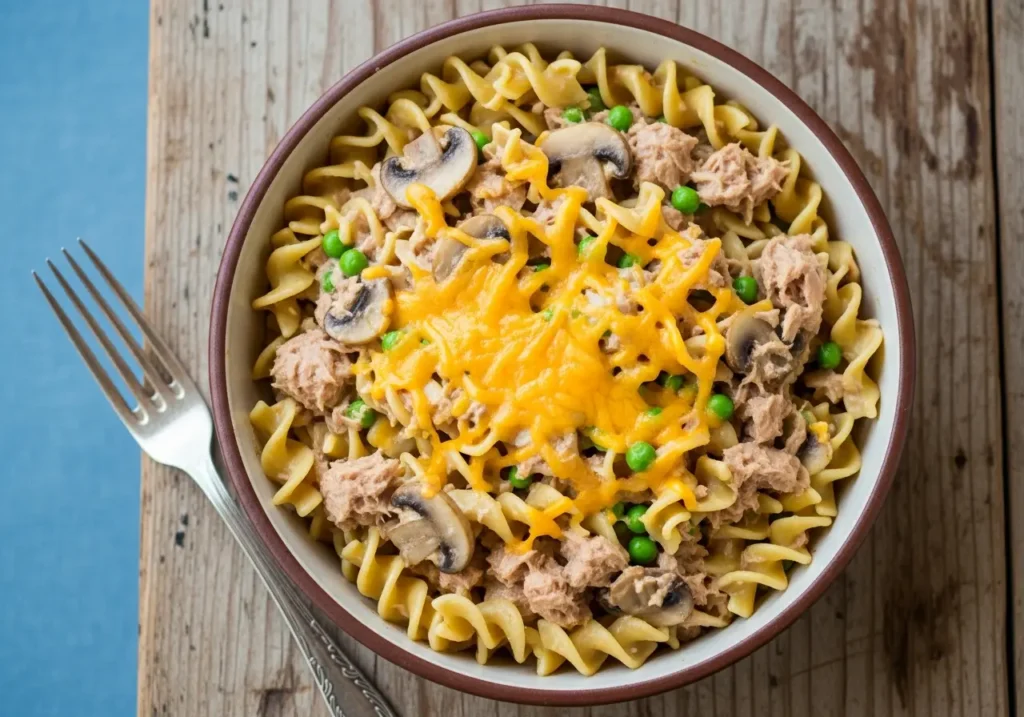
Microwave Scrambled Eggs in a Mug
This changed breakfast forever in the 90s. I remember making this before school all the time. It’s so fast that you can make it even when you’re running late. No dirty pans to wash.
Just a mug and a fork. The eggs come out fluffy and perfect every time. I add different toppings depending on what I have around. Sometimes cheese, sometimes ham, sometimes just salt and pepper. It’s versatile and foolproof.
Even kids can make this with supervision. It taught me basic cooking when I was young. Now I make it when I need a quick protein boost any time of day. It’s not just for breakfast anymore. I’ve had it for lunch and even a late-night snack.
Serve: 1 | Prep Time: 2 minutes | Cook Time: 2 minutes | Total Time: 4 minutes
Ingredients:
- 2 large eggs
- 2 tablespoons milk
- Salt and pepper to taste
- 2 tablespoons shredded cheese
- 1 tablespoon diced ham or bacon bits (optional)
- Butter or cooking spray for the mug
How To Make:
Prep Your Mug – Choose a large microwave-safe mug. Spray it with cooking spray or rub a small bit of butter inside to prevent sticking.
Crack and Mix – Crack both eggs into the mug. Add the milk, salt, and pepper. Use a fork to beat everything together until the yolks and whites are completely mixed and you see some bubbles.
Add Mix-ins – Toss in your cheese and ham or bacon if you’re using them. Give it another quick stir with your fork.
First Microwave – Put the mug in the microwave and cook on high for 45 seconds. The eggs will start to set around the edges.
Stir and Cook Again – Take the mug out carefully (it might be hot). Stir the eggs with your fork, breaking up the cooked parts and mixing with the liquid parts. Put it back in the microwave for another 30-45 seconds until the eggs are cooked through but still a bit wet-looking.
Let It Rest – Take the mug out and let it sit for 30 seconds. The eggs will finish cooking from the residual heat and become fluffy.
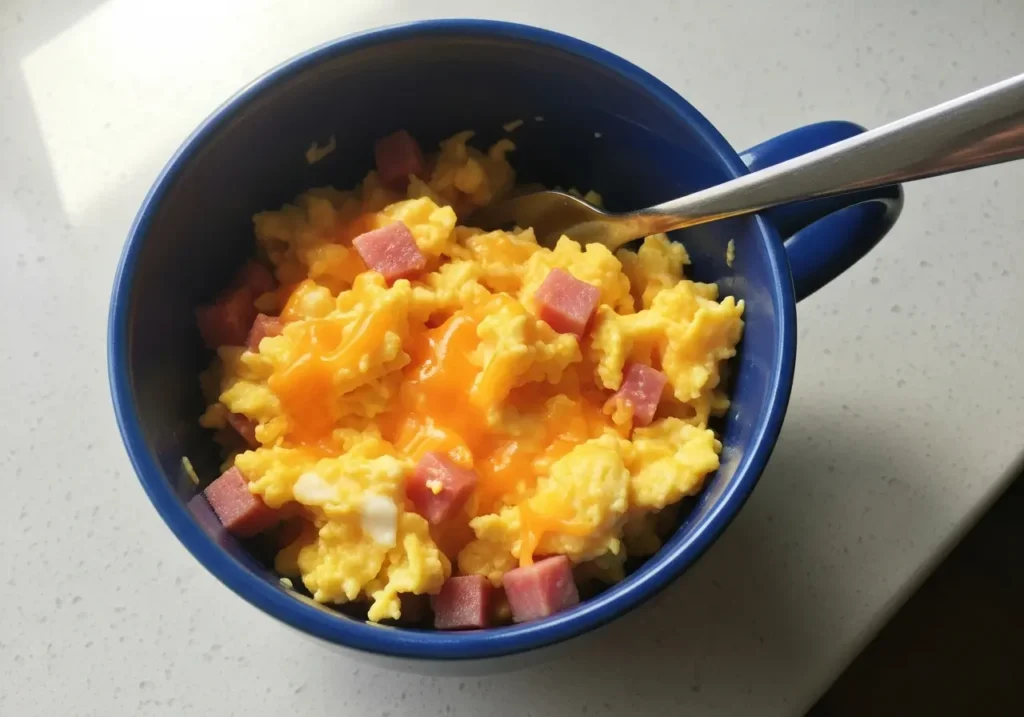
3. Instant Ramen Upgrade Bowl
We all ate plain ramen in the 90s. But this upgraded version takes it from college food to real meal. I started making this when I wanted ramen to actually fill me up. The additions don’t take any extra time but make such a difference. You get vegetables, protein, and more flavor. It still uses the flavor packet, so nothing goes to waste.
This was my after-school snack that turned into dinner. I’d make it while watching TV and feel like a real chef. The egg adds richness and the veggies add crunch. It’s amazing how a few simple additions change everything. This is comfort food that actually comforts you.
Serve: 1 | Prep Time: 2 minutes | Cook Time: 5 minutes | Total Time: 7 minutes
Ingredients:
- 1 package instant ramen noodles with flavor packet
- 2 cups water
- 1 egg
- 1/4 cup frozen mixed vegetables
- 2 slices deli ham or leftover cooked chicken, chopped
- 1/2 teaspoon soy sauce
- Dash of hot sauce (optional)
- 1 green onion, sliced (if available)
How To Make:
Boil the Water – Pour 2 cups of water into a small pot and put it on the stove over high heat. Wait until you see big bubbles rolling across the surface.
Add Noodles and Veggies – Break the ramen block in half if you want shorter noodles. Drop it into the boiling water along with the frozen vegetables. Let it cook for 2 minutes.
Crack the Egg – Crack your egg into a small bowl first. Then slowly pour it into the boiling noodles, stirring gently with a fork or chopstick as you pour. This creates egg ribbons throughout your ramen. Cook for 1 more minute.
Season It Up – Tear open the flavor packet and sprinkle it over your noodles. Add the soy sauce and hot sauce if you like spice. Stir everything together.
Add the Protein – Turn off the heat. Add your chopped ham or chicken and stir it in. The hot broth will warm it up.
Serve – Pour everything into a bowl. Top with sliced green onions if you have them. Eat it with a fork or chopsticks while it’s hot.
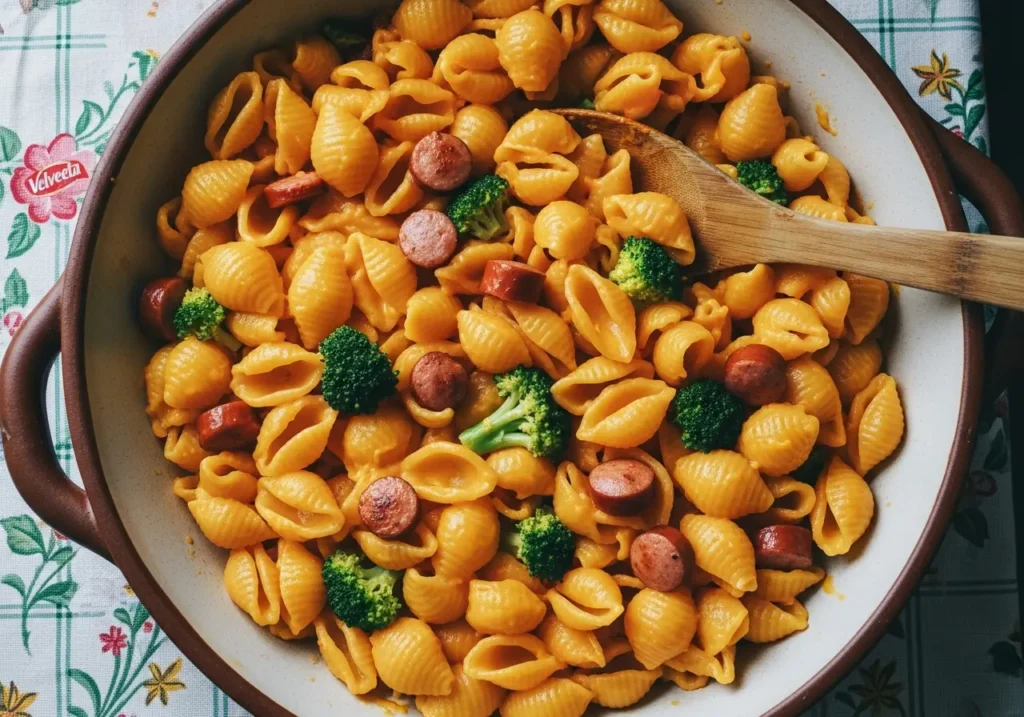
4. Velveeta Shells and Cheese Deluxe
Boxed mac and cheese was huge in the 90s. But Velveeta shells were the fancy version. I remember begging my mom to buy these instead of the regular kind. The cheese sauce is so creamy and smooth. It coats every shell perfectly. This takes barely any longer than the plain version but tastes so much better. I add extras to make it more filling. Sometimes broccoli, sometimes hot dogs, sometimes just extra cheese.
It’s the kind of meal that makes everyone at the table smile. Kids clean their plates. Adults get a nostalgia hit. And you’re done cooking in the time it takes to set the table.
Serve: 3-4 | Prep Time: 1 minute | Cook Time: 8 minutes | Total Time: 9 minutes
Ingredients:
- 1 box Velveeta Shells & Cheese (or any shell pasta brand)
- 6 cups water
- 2 tablespoons butter
- 1/4 cup milk
- The cheese sauce packet from the box
- 1 cup frozen broccoli florets (optional)
- 3 hot dogs, sliced (optional)
How To Make:
Boil Water Fast – Put a big pot of water on your stove and turn the heat to high. Add a pinch of salt if you want. Wait for it to boil hard with lots of bubbles.
Cook the Shells – Pour the shells from the box into the boiling water. Stir them once so they don’t stick. Cook for 6-7 minutes, stirring occasionally. If adding broccoli, toss it in during the last 2 minutes of cooking.
Drain – Put a colander in your sink. Carefully pour the shells and water through it. Shake the colander a bit to get out extra water. Put the shells back in the pot.
Make It Creamy – Put the pot back on the stove but turn off the heat. Add butter and milk to the hot shells. Stir until the butter melts.
Add Cheese Sauce – Tear open the cheese packet and squeeze all of it into the pot. Stir everything together until every shell is covered in that smooth, orange cheese sauce.
Add Extras – If you cooked hot dogs separately in the microwave or have leftover cooked ones, slice them up and stir them in now. Everything will heat together.
Serve – Scoop into bowls and eat right away while the cheese is at its creamiest.
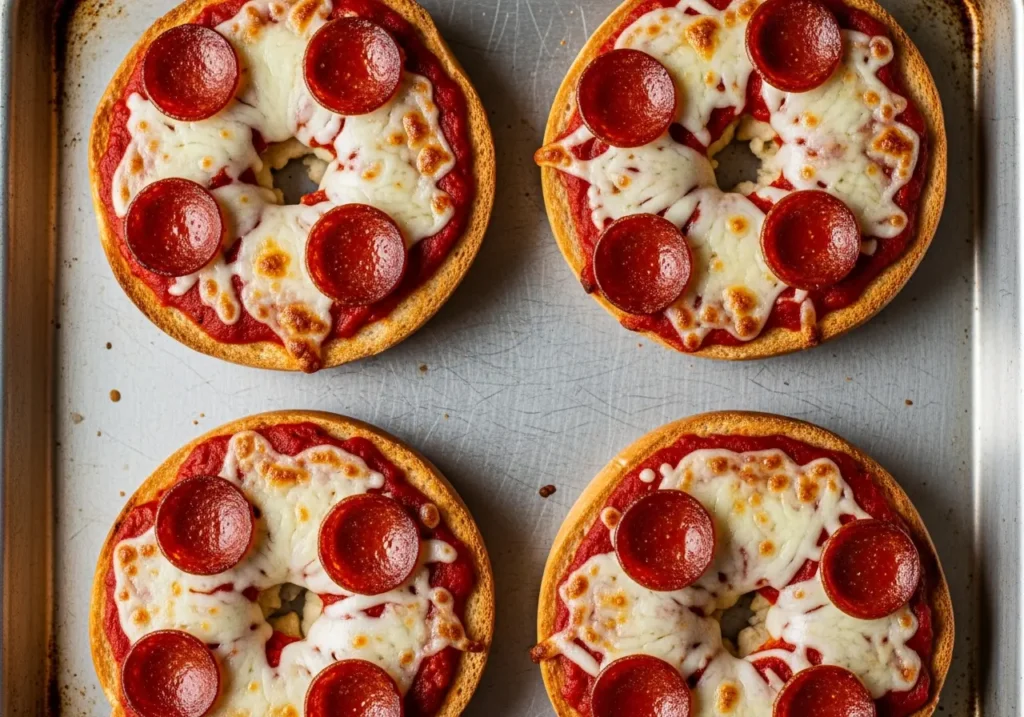
5. Bagel Pizza Bites
These were the ultimate after-school snack in the 90s. I made these every single day for a while. They’re so easy that even young kids can help. You get the crispy bagel bottom with gooey cheese on top. It tastes just like pizza but comes together in minutes.
I use whatever toppings I have around. Sometimes pepperoni, sometimes just cheese, sometimes vegetables. The bagel holds up better than bread and has more flavor than English muffins. These are perfect for quick lunches too. I make them when I don’t want to cook but want something hot and satisfying. They’re better than frozen pizza and faster too.
Serve: 2 | Prep Time: 3 minutes | Cook Time: 5 minutes | Total Time: 8 minutes
Ingredients:
- 2 bagels (any kind)
- 1/2 cup pizza sauce or marinara
- 1 cup shredded mozzarella cheese
- 12 pepperoni slices
- 1/2 teaspoon Italian seasoning
- Garlic powder to taste
How To Make:
Slice the Bagels – Take each bagel and cut it in half like you’re making a sandwich. You’ll have 4 bagel halves. Place them cut-side up on a baking sheet or microwave-safe plate.
Spread the Sauce – Spoon about 2 tablespoons of pizza sauce onto each bagel half. Use the back of the spoon to spread it around, leaving a tiny edge.
Add the Cheese – Sprinkle mozzarella cheese over the sauce on each bagel. Use as much or as little as you like. More cheese is always good.
Top It Off – Place 3 pepperoni slices on each bagel half. Sprinkle everything with Italian seasoning and a light dusting of garlic powder.
Broil or Microwave – For crispy bagels, put them under the broiler for 3-4 minutes until the cheese bubbles and browns slightly. Watch them carefully so they don’t burn. For softer bagels, microwave them for 45-60 seconds until the cheese melts.
Cool and Eat – Let them cool for 1 minute so you don’t burn your mouth on the hot cheese. Then bite into that crispy, cheesy goodness.
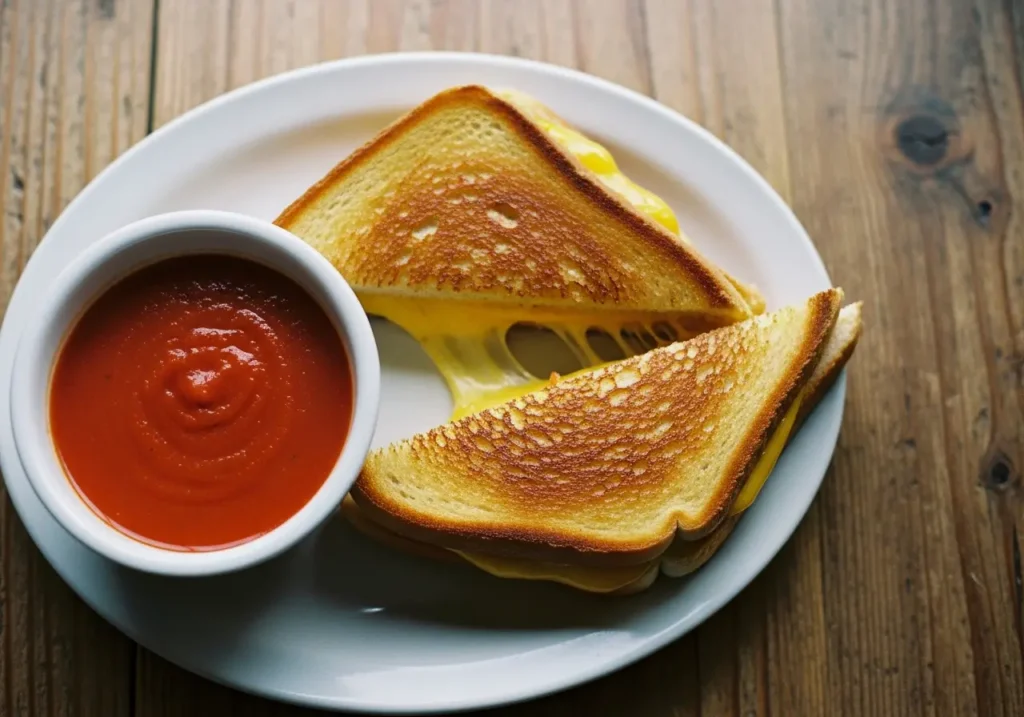
6. Grilled Cheese with Tomato Soup Dip
This combo defined cozy 90s dinners. I still make this when I need comfort food fast. The grilled cheese gets crispy on the outside and melty on the inside. Dipping it in warm tomato soup is pure magic. My kids love this just like I did as a kid. It’s simple but it never gets old. The trick is getting the bread golden without burning it. Low heat and patience win here. I use whatever bread and cheese I have. White bread and American cheese is classic, but any combo works. The soup warms you from the inside. Together, they’re unbeatable.
Serve: 2 | Prep Time: 2 minutes | Cook Time: 8 minutes | Total Time: 10 minutes
Ingredients:
- 4 slices white bread or your favorite bread
- 4 slices American cheese or cheddar
- 2 tablespoons butter, softened
- 1 can (10.75 oz) condensed tomato soup
- 1 soup can filled with milk or water
- Salt and pepper to taste
How To Make:
Start the Soup – Open the can of tomato soup and pour it into a small pot. Fill the empty can with milk or water and add that to the pot too. Put it on the stove over medium heat. Stir it now and then while you make the sandwiches. Add a pinch of salt and pepper if you like.
Butter the Bread – Spread butter on one side of each slice of bread. Make sure you cover the whole surface. This is what makes the bread turn golden and crispy.
Build the Sandwich – Put 2 slices of bread butter-side down on your counter. Place 2 slices of cheese on each one. Top with the other bread slices, butter-side up.
Heat the Pan – Put a large skillet or griddle on the stove over medium-low heat. Let it warm up for 1 minute.
Grill the Sandwiches – Place both sandwiches in the pan. Cook for 3-4 minutes on the first side. Don’t peek too much, but check to see when it’s golden brown. Flip carefully with a spatula and cook the other side for 3-4 minutes until golden and the cheese is melted.
Serve Together – Cut each sandwich in half diagonally. Pour the hot soup into bowls. Place sandwiches on plates next to the soup bowls for dipping. Dunk and enjoy.
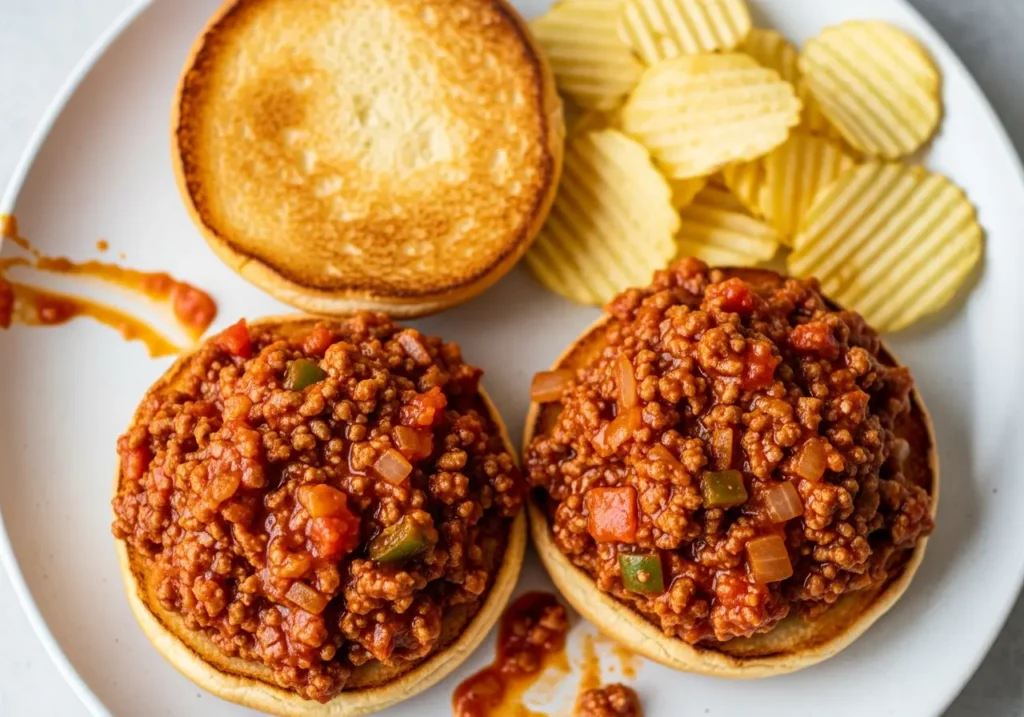
7. Sloppy Joes on Buns
Every 90s kid knows Sloppy Joes. These messy, saucy sandwiches were dinner magic. I make them in one pan in less time than ordering takeout.
The sweet and tangy sauce gets all over everything, but that’s the fun part. You need plenty of napkins. Ground beef browns fast, and the canned sauce does all the flavor work for you. I serve these with chips and pickles.
It’s a complete meal that feels special even though it’s so simple. Kids love assembling their own sandwiches. Adults love how fast cleanup is. This is 90s nostalgia you can eat.
Serve: 4 | Prep Time: 2 minutes | Cook Time: 8 minutes | Total Time: 10 minutes
Ingredients:
- 1 pound ground beef
- 1 can (15 oz) Sloppy Joe sauce (Manwich or similar)
- 1/4 cup water
- 1/2 teaspoon garlic powder
- 4 hamburger buns
- Salt and pepper to taste
How To Make:
Brown the Meat – Put a large skillet on the stove over medium-high heat. Add the ground beef. Break it up with a wooden spoon or spatula. Cook it for 4-5 minutes, stirring and breaking it into smaller pieces until no pink shows. If there’s a lot of grease, carefully drain most of it off.
Add the Sauce – Pour the entire can of Sloppy Joe sauce over the cooked meat. Add the water and garlic powder. Stir everything together.
Simmer Quick – Turn the heat down to medium. Let the mixture bubble gently for 3-4 minutes, stirring occasionally. It will thicken up and the flavors blend together. Taste it and add salt and pepper if needed.
Toast the Buns – While the meat simmers, you can toast your hamburger buns in a toaster or under the broiler for 1 minute if you want them crispy. This is optional but nice.
Assemble – Place the bottom bun on a plate. Spoon a generous amount of the meat mixture onto it. Put the top bun on. Repeat with remaining buns.
Serve Messy – Hand out napkins and dig in. The best way to eat these is with your hands, accepting that sauce will get everywhere.


Leave a Reply