
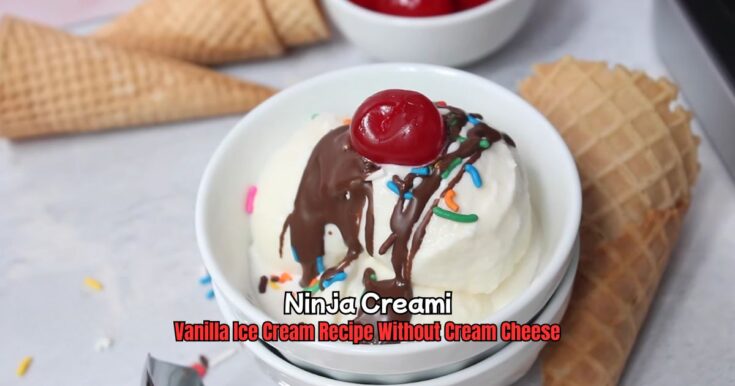
I scream, you scream, we all scream for ice cream! If you’re craving a smooth, creamy vanilla ice cream but want to skip the cream cheese, I’ve got you covered with this super easy Ninja Creami vanilla ice cream recipe without cream cheese.
Picture this: a hot summer day, a bowl of velvety vanilla ice cream melting slowly, and that sweet, rich flavor hitting all the right spots.
You’ll love this recipe because it’s simple, uses everyday ingredients, and tastes like a dream. With the Ninja Creami, it’s a breeze to whip up this treat at home. Want to try something different?
Check out my Ninja Creami Protein Ice Cream Recipe for another yummy option. Let’s get started and make this delicious dessert together!

Why You Love This Ninja Creami Vanilla Ice Cream Recipe Without Cream Cheese
This Ninja Creami vanilla ice cream recipe without cream cheese is a game-changer, and here’s why you’ll be hooked:
- Super Simple: Only four ingredients, and no cooking needed!
- Smooth and Creamy: Gets that perfect ice cream texture without cream cheese.
- Customizable: Add your favorite mix-ins like chocolate chips or fruit.
- Quick Prep: Mix it in minutes, freeze, and let the Ninja Creami do the rest.
- Kid-Friendly: My kids go wild for this sweet, classic vanilla flavor.
I love how easy this recipe is! You mix a few pantry staples, pop it in the freezer, and the Ninja Creami turns it into a creamy masterpiece.
Ninja Creami Vanilla Ice Cream Recipe Without Cream Cheese Ingredients
Let’s talk about the ingredients you’ll need for this Ninja Creami vanilla ice cream recipe without cream cheese. Each one plays a big role in making your ice cream rich and delicious. Here’s the breakdown:
- Heavy Whipping Cream (¾ cup): This is the star for that creamy, rich texture. Look for heavy cream with at least 35% fat—it’s what gives the ice cream its smooth, indulgent feel. I grab mine from the dairy aisle, usually in a carton. If you’re in the U.S., it’s often labeled “heavy cream” or “heavy whipping cream.”
- Whole Milk (1 cup): Milk balances the richness of the cream, keeping the ice cream scoopable and not too heavy. I use whole milk for the best flavor, but 2% works in a pinch. It’s easy to find at any grocery store, and I always keep some in my fridge.
- Powdered Sugar (⅓ cup): This sweetens the ice cream and dissolves smoothly, so you don’t get gritty bits. Powdered sugar is finer than regular sugar, which helps with the texture. You’ll find it in the baking aisle, often called confectioners’ sugar.
- Vanilla Extract (1 teaspoon): This gives the ice cream that classic vanilla flavor we all love. Use pure vanilla extract for the best taste—imitation stuff just doesn’t cut it. I keep a small bottle in my pantry for baking and ice cream making.
Helpful Swaps
If you’re missing something or want to tweak this Ninja Creami vanilla ice cream recipe without cream cheese, here are some swaps that work:
- Heavy Whipping Cream: Swap with half-and-half for a lighter texture, but it won’t be as creamy. For dairy-free, try full-fat coconut milk or unsweetened coconut cream.
- Whole Milk: Use 2% milk or non-dairy options like oat milk or almond milk. Oat milk gives a nice creamy feel, but almond milk might make it a bit thinner.
- Powdered Sugar: Granulated sugar works, but stir extra to make sure it dissolves. For a healthier option, try honey or agave nectar, but use the “Lite Ice Cream” setting on the Ninja Creami.
- Vanilla Extract: Vanilla bean paste is a fancy swap for little black flecks and richer flavor. Use the same amount.
I’ve tried coconut milk for a dairy-free version, and it was a hit at my last family dinner. Just make sure to adjust the Ninja Creami settings if you use lighter ingredients!
Kitchen Equipment Needed
To make this Ninja Creami vanilla ice cream recipe without cream cheese, you’ll need a few basic tools. Don’t worry, nothing fancy here:
- Ninja Creami Ice Cream Maker: The star of the show! It churns your frozen base into creamy ice cream. Make sure it’s plugged in and ready to go.
- Ninja Creami Pint Container: This is where you’ll mix and freeze your ice cream base. It comes with the machine and has a handy “Max Fill” line.
- Measuring Cups and Spoons: For getting the right amounts of cream, milk, sugar, and vanilla. I use a liquid measuring cup for the cream and milk.
- Whisk or Fork: To mix everything smoothly. A whisk is great, but a fork works if that’s what you have.
- Blender (Optional): Makes mixing super fast and ensures no sugar lumps. I use my Ninja blender, but any blender will do.
- Freezer: You’ll need a flat spot in your freezer to freeze the pint for 24 hours. I keep mine at 0°F for the best results.
How To Make Ninja Creami Vanilla Ice Cream Recipe Without Cream Cheese
Making this Ninja Creami vanilla ice cream recipe without cream cheese is so easy, even if you’ve never made ice cream before. I’ll walk you through each step like I’m right there in your kitchen. Let’s do this!
Step 1 | Mix the Ingredients
Grab your Ninja Creami pint container or a medium bowl. Pour in ¾ cup of heavy whipping cream and 1 cup of whole milk. Add ⅓ cup of powdered sugar and 1 teaspoon of vanilla extract. Use a whisk or fork to stir everything together until the sugar completely dissolves. This takes about a minute. If you want it extra smooth, toss it all in a blender for 10-20 seconds. I blend mine because it’s faster and makes sure there are no lumps.
Step 2 | Pour into the Pint
If you mixed in a bowl, pour the mixture into the Ninja Creami pint container. Be careful not to go past the “Max Fill” line—it’s marked on the side. I learned the hard way that overfilling can mess with the machine. Snap the lid on tightly.
Step 3 | Freeze the Mixture
Place the pint on a flat spot in your freezer. Let it freeze for at least 24 hours. I set mine at 0°F to make sure it’s solid. A level surface is key so the mixture freezes evenly and doesn’t mess up your Ninja Creami. I usually prep this in the evening so it’s ready the next night.
Step 4 | Set Up the Ninja Creami
After 24 hours, take the pint out of the freezer and remove the lid. Plug in your Ninja Creami and place it on a clean, flat counter. Pop the pint into the outer bowl. Press and hold the paddle latch on the outer bowl lid, then slide the Creamerizer Paddle into the bottom. Release the latch to lock it in. Line up the lid’s tab just to the right of the bowl’s handle, then twist clockwise to lock it.
Step 5 | Churn the Ice Cream
Place the outer bowl onto the Ninja Creami’s motor base, with the handle centered below the control panel. Twist the handle to the right until it clicks—this raises the platform and locks the bowl. Turn on the machine by pressing the power button. The “Ice Cream” button should light up. Press it, and let the machine churn for about 2 minutes. It’s loud, but that’s normal!
Step 6 | Check the Texture
When the churning stops, hold the bowl release button on the left side of the machine and twist the handle back to the center to lower the bowl. Lift it out, press the lid unlock button, and twist the lid counterclockwise to remove it. Check your ice cream. If it’s creamy and scoopable, you’re done! If it looks crumbly or powdery, move to the next step.
Step 7 | Re-Spin if Needed
If the ice cream is crumbly, add 1 tablespoon of milk to the pint. Put the lid back on, lock it into the outer bowl, and place it back on the machine. Press the “Re-Spin” button. This takes another minute or two and usually makes it super creamy. I had to re-spin once when my freezer was extra cold, and it worked like a charm.
Step 8 | Serve and Enjoy
Lift the pint out of the outer bowl, grab a spoon, and scoop your ice cream into bowls. It’s ready to eat! If you want to add mix-ins like chocolate chips or sprinkles, make a 1.5-inch hole in the center of the ice cream, add your mix-ins, and run the “Mix-In” program. I love adding mini chocolate chips for a little crunch.
Recipe Tips for Success
Here are some quick tips to make your Ninja Creami vanilla ice cream recipe without cream cheese perfect every time. These aren’t in the steps but will help you nail it:
- Check Freezer Temp: Set your freezer to 0°F to -7°F for the best texture. Too cold, and it might be crumbly; too warm, and it won’t set.
- Don’t Overfill: Stay below the “Max Fill” line to avoid stressing the machine.
- Smooth the Top: Before re-freezing leftovers, flatten the ice cream with a spoon for easier re-spinning later.
- Use High-Quality Vanilla: Pure vanilla extract makes a big difference in flavor.
- Blend for Smoothness: A blender ensures no sugar grains, especially with powdered sugar.
- Let It Sit: If the pint is too hard, let it sit for 5-10 minutes before churning.
Ninja Creami Vanilla Ice Cream Recipe Without Cream Cheese Serving Suggestions
This Ninja Creami vanilla ice cream recipe without cream cheese is so versatile, you’ll want to serve it all the time! Here are some fun ways to enjoy it:
- Classic Cone: Scoop into a waffle cone for that ice cream shop vibe.
- Sundae Style: Top with chocolate sauce, whipped cream, and a cherry.
- With Fruit: Add fresh strawberries or bananas for a fresh twist.
- Dessert Pairing: Serve with warm brownies or apple pie for a cozy treat.
- Sprinkle Party: Let kids add colorful sprinkles for a fun dessert.
How to Store Ninja Creami Vanilla Ice Cream Recipe Without Cream Cheese
Storing this Ninja Creami vanilla ice cream recipe without cream cheese is easy, so you can enjoy it later. After serving, smooth the top of any leftover ice cream in the pint with a spoon or spatula.
Pop the lid back on tightly and store it in the freezer on a flat surface. It’ll stay good for 2-3 weeks, but I recommend eating it within a week for the best flavor. If it gets hard, just re-spin it using the “Ice Cream” setting.
You can also scoop leftovers into an airtight container, but the pint works best to avoid freezer burn. I always flatten the top before freezing to make re-spinning easier—it’s a lifesaver for keeping that creamy texture!
Ninja Creami Vanilla Ice Cream Recipe Without Cream Cheese FAQs
1. Why is my ice cream crumbly after churning?
Crumbly ice cream usually means the base is too cold or lacks enough fat. Try adding 1 tablespoon of milk and re-spin. Also, check your freezer temp—it should be 0°F to -7°F. I’ve had this happen when my freezer was set too low. Letting the pint sit for 5-10 minutes before churning can also help.
2. Can I use granulated sugar instead of powdered sugar?
Yes, but powdered sugar dissolves better for a smoother texture. If you use granulated sugar, blend the mixture in a blender to make sure it fully dissolves. I tried granulated sugar once, and it worked fine after blending, but powdered sugar is my go-to for ease.
3. How do I add mix-ins to this ice cream?
After the first spin, make a 1.5-inch hole in the center of the ice cream. Add mix-ins like chocolate chips, sprinkles, or cookie bits, then run the “Mix-In” program. I love mini chocolate chips—they spread evenly and add a nice crunch without overpowering the vanilla flavor.
4. Can I make this recipe without a Ninja Creami?
The Ninja Creami makes this super easy, but you can try a no-churn method. Mix the ingredients, pour into a freezer-safe container, and freeze for 6-8 hours, stirring every 30 minutes for the first 2 hours to prevent ice crystals. It won’t be as creamy, but it’s still tasty!
5. How long does it take to freeze the ice cream base?
The recipe needs at least 24 hours in the freezer to set properly. I’ve tried 12 hours in a pinch, and it worked, but 24 hours is best for a solid base. Make sure your freezer is at 0°F and the pint is on a flat surface to freeze evenly.
Ninja Creami Vanilla Ice Cream Recipe Without Cream Cheese
Creamy and delicious Ninja Creami vanilla ice cream recipe without cream cheese—ready in just 5 minutes prep time + 24 hrs freeze. Easy and indulgent!
Ingredients
- ¾ cup heavy whipping cream (at least 35% fat)
- 1 cup whole milk
- ⅓ cup powdered sugar
- 1 teaspoon pure vanilla extract
Notes
Step 1 | Mix the Ingredients
Grab your Ninja Creami pint container or a medium bowl. Pour in ¾ cup of heavy whipping cream and 1 cup of whole milk. Add ⅓ cup of powdered sugar and 1 teaspoon of vanilla extract. Use a whisk or fork to stir everything together until the sugar completely dissolves. This takes about a minute. If you want it extra smooth, toss it all in a blender for 10-20 seconds. I blend mine because it’s faster and makes sure there are no lumps.
Step 2 | Pour into the Pint
If you mixed in a bowl, pour the mixture into the Ninja Creami pint container. Be careful not to go past the “Max Fill” line—it’s marked on the side. I learned the hard way that overfilling can mess with the machine. Snap the lid on tightly.
Step 3 | Freeze the Mixture
Place the pint on a flat spot in your freezer. Let it freeze for at least 24 hours. I set mine at 0°F to make sure it’s solid. A level surface is key so the mixture freezes evenly and doesn’t mess up your Ninja Creami. I usually prep this in the evening so it’s ready the next night.
Step 4 | Set Up the Ninja Creami
After 24 hours, take the pint out of the freezer and remove the lid. Plug in your Ninja Creami and place it on a clean, flat counter. Pop the pint into the outer bowl. Press and hold the paddle latch on the outer bowl lid, then slide the Creamerizer Paddle into the bottom. Release the latch to lock it in. Line up the lid’s tab just to the right of the bowl’s handle, then twist clockwise to lock it.
Step 5 | Churn the Ice Cream
Place the outer bowl onto the Ninja Creami’s motor base, with the handle centered below the control panel. Twist the handle to the right until it clicks—this raises the platform and locks the bowl. Turn on the machine by pressing the power button. The “Ice Cream” button should light up. Press it, and let the machine churn for about 2 minutes. It’s loud, but that’s normal!
Step 6 | Check the Texture
When the churning stops, hold the bowl release button on the left side of the machine and twist the handle back to the center to lower the bowl. Lift it out, press the lid unlock button, and twist the lid counterclockwise to remove it. Check your ice cream. If it’s creamy and scoopable, you’re done! If it looks crumbly or powdery, move to the next step.
Step 7 | Re-Spin if Needed
If the ice cream is crumbly, add 1 tablespoon of milk to the pint. Put the lid back on, lock it into the outer bowl, and place it back on the machine. Press the “Re-Spin” button. This takes another minute or two and usually makes it super creamy. I had to re-spin once when my freezer was extra cold, and it worked like a charm.
Step 8 | Serve and Enjoy
Lift the pint out of the outer bowl, grab a spoon, and scoop your ice cream into bowls. It’s ready to eat! If you want to add mix-ins like chocolate chips or sprinkles, make a 1.5-inch hole in the center of the ice cream, add your mix-ins, and run the “Mix-In” program. I love adding mini chocolate chips for a little crunch.
Nutrition Information:
Serving Size:
1Amount Per Serving: Calories: 240Total Fat: 19gSaturated Fat: 12gCholesterol: 70mgSodium: 30mgCarbohydrates: 16gSugar: 15gProtein: 2g
Did you make this Ninja Creami vanilla ice cream recipe without cream cheese? Please leave a ⭐ rating and review!


Leave a Reply