
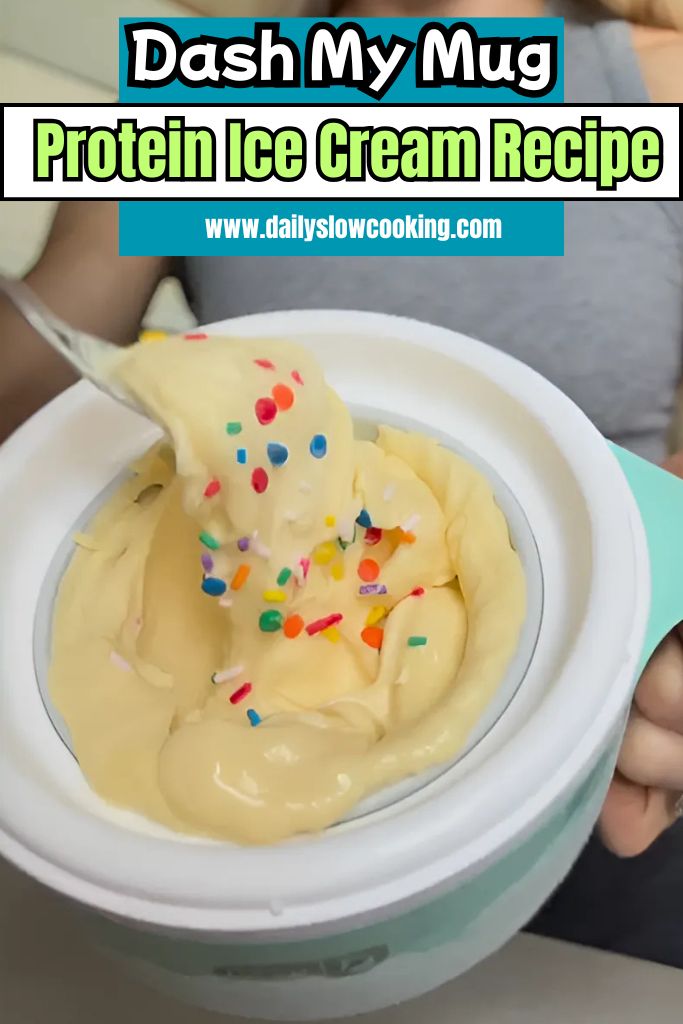
Ever wanted to enjoy ice cream that’s cold, creamy, and packed with protein—but without the fuss? Let me show you how I make my go-to treat, the Dash My Mug Protein Ice Cream Recipe.
Making this protein ice cream at home is easier than you think, especially when you’ve got a Dash My Mug Ice Cream Maker. It’s small, simple, and doesn’t take much space. I like using it when I want a sweet bite that’s also good for me.
In this post, I’ll walk you through every step. If you’re also into frozen treats, check out my Ninja Creami Protein Ice Cream Recipe too!
This one’s different though. You don’t need any fancy tools—just your Dash My Mug and a few basic ingredients.
Let’s get started!
Why You Love This Dash My Mug Protein Ice Cream
This Dash My Mug Protein Ice Cream Recipe is a game-changer for dessert lovers like me! Here’s why you’ll fall in love with it:
- Healthy and Tasty: It’s packed with protein, so you feel good about eating it.
- Super Easy: The Dash My Mug makes it simple, even if you’re a beginner.
- Customizable: Add your favorite mix-ins like chocolate chips or fruit.
- Quick Treat: Ready in about 20 minutes—no long waits!
- Perfect Portion: Makes just enough for one or two, so no leftovers to tempt you.
I love how this recipe lets me enjoy a sweet treat without guilt. The Dash My Mug churns it into a creamy, soft-serve delight that’s perfect for a cozy night in.
Dash My Mug Protein Ice Cream Ingredients
Here’s everything you need to make this yummy protein ice cream. I’ll explain each ingredient so you know why it’s important and how it helps create that creamy texture.
- Whole Milk (½ cup): This gives the ice cream a rich, smooth base. Whole milk has enough fat to make it creamy without being too heavy. I use it because it blends well with the protein powder and keeps the texture soft.
- Heavy Cream (½ cup): This adds extra creaminess and makes the ice cream feel indulgent. It’s the key to that soft-serve texture we all love. I always chill it in the fridge before using it for the best results.
- Vanilla Protein Powder (1 scoop, about 30g): This is the star for adding protein! I use a vanilla-flavored one because it tastes great and mixes smoothly. Choose a plant-based or whey protein powder, but avoid whey if you want a creamier freeze. It adds about 15-20 grams of protein per serving.
- Granulated Sweetener (2 tablespoons): I use a sugar-free sweetener like monk fruit to keep it low-carb, but regular sugar works too. It dissolves easily and adds just the right sweetness without overpowering the flavor.
- Vanilla Extract (½ teaspoon): This boosts the vanilla flavor, making the ice cream taste like a classic treat. A little goes a long way, so don’t skip it—it adds depth to the taste.
- Pinch of Salt: Just a tiny bit enhances all the flavors. It makes the sweetness pop and balances everything out. I use regular table salt, but sea salt works too.
- Optional Mix-Ins (¼ cup): Think chocolate chips, crushed cookies, or chopped fruit. These add fun textures and flavors. I love tossing in some dark chocolate chips for a little crunch!
Helpful Swaps
If you don’t have some ingredients or want to mix things up, here are some swaps that work just as well:
- Milk: Swap whole milk for almond milk or coconut milk for a dairy-free version. Just make sure it’s unsweetened to control the sweetness.
- Heavy Cream: Use coconut cream for a dairy-free option. It’s just as creamy and adds a slight coconut flavor.
- Sweetener: Try honey or maple syrup instead of granulated sweetener, but use a bit less since they’re sweeter. Adjust to taste.
- Protein Powder: If you don’t have vanilla, use chocolate or unflavored protein powder. Just add a touch more vanilla extract for flavor.
- Mix-Ins: Swap chocolate chips for nuts, dried fruit, or even a swirl of peanut butter for a different twist.
Kitchen Equipment Needed
To make this Dash My Mug Protein Ice Cream, you’ll need a few simple tools. Don’t worry, it’s all stuff you probably already have or can easily get:
- Dash My Mug Ice Cream Maker: The star of the show! It comes with a mug (cooling bowl), motor, lid, and paddle. Freeze the mug for 24 hours before using.
- Liquid Measuring Cup: For measuring milk and cream accurately. I use a glass one with clear markings.
- Measuring Spoons: For the sweetener, vanilla extract, and salt. Precision matters here!
- Whisk or Spoon: To mix the ingredients smoothly. A whisk works best to dissolve the sweetener and protein powder.
- Small Bowl: For combining the ingredients before pouring them into the mug.
- Spatula (optional): Handy for scraping the mixture into the ice cream maker or mixing in add-ins.
- Freezer: To freeze the mug before churning and to store leftovers.
How to Make Dash My Mug Protein Ice Cream
Making this Dash My Mug Protein Ice Cream is so easy, even if you’ve never made ice cream before. I’ll walk you through each step so you can follow along and get that creamy, dreamy dessert. Let’s get started!
Step 1 | Freeze the Mug
First, put the Dash My Mug cooling bowl in the freezer for at least 24 hours. Keep it upright, not on its side. Your freezer should be at 0°F or colder. I usually leave mine in the freezer all the time so it’s ready whenever I want ice cream.
Step 2 | Mix the Base
In a small bowl or liquid measuring cup, pour in ½ cup of whole milk. Add 2 tablespoons of granulated sweetener (I use monk fruit). Whisk it well until the sweetener completely dissolves. This takes about a minute. Then, add ½ cup of heavy cream, 1 scoop of vanilla protein powder, ½ teaspoon of vanilla extract, and a pinch of salt. Whisk everything together until it’s smooth and there are no lumps. I make sure to mix it well so the protein powder doesn’t clump.
Step 3 | Chill the Mixture
Pop the mixture in the fridge for about 2 hours. This helps it churn better and gives you a creamier texture. If you’re in a rush, you can skip this, but I find chilling makes a big difference.
Step 4 | Set Up the Ice Cream Maker
Take the mug out of the freezer and place it on a flat surface, like your kitchen counter. Attach the motor to the lid until it clicks into place. Then, snap the paddle into the slot on the bottom of the motor. Lower the lid with the motor and paddle onto the mug, lining up the pins with the notches on the mug’s locking base. Twist it clockwise to lock it in.
Step 5 | Start Churning
Plug in the Dash My Mug Ice Cream Maker and press the power switch. The paddle will start spinning. Slowly pour your chilled mixture through the ingredient chute while the motor is running. I pour it in a steady stream to avoid spills.
Step 6 | Add Mix-Ins (Optional)
If you want mix-ins like chocolate chips or fruit, add about ¼ cup through the chute during the last 5 minutes of churning. This way, they mix in evenly without sinking to the bottom. I love adding dark chocolate chips for a little crunch!
Step 7 | Churn Until Done
Let the machine churn for 15-20 minutes, or until the ice cream looks like soft-serve. You’ll know it’s ready when it’s thick and creamy. If you want it firmer, pop the mug in the freezer for 1-2 hours.
Step 8 | Serve and Enjoy
Turn off the motor and twist the lid counterclockwise to unlock it. Lift off the lid, and the paddle will stay in the ice cream to keep things tidy. Grab a spoon and dig in right from the mug! It’s so fun to eat it straight from the maker.
Recipe Tips for Success
Here are some quick tips to make your Dash My Mug Protein Ice Cream turn out perfect every time. These are little tricks I’ve learned from making it over and over:
- Freeze the Mug Well: Make sure the mug is frozen solid (no sloshing sounds) for the best texture.
- Chill Ingredients: Cold milk and cream churn better, so keep them in the fridge until you’re ready.
- Don’t Overfill: Stick to about 10 ounces of liquid to avoid overflow in the mug.
- Mix Thoroughly: Whisk the protein powder well to avoid clumps in your ice cream.
- Taste Before Churning: Try the mixture and adjust sweetness if needed before pouring it in.
- Clean Right Away: Rinse the paddle and lid after use to make cleanup easier.
Dash My Mug Protein Ice Cream Serving Suggestion
You’ll love serving this Dash My Mug Protein Ice Cream because it’s so versatile! Here are some fun ways to enjoy it:
- Top with Fruit: Add fresh strawberries or bananas for a sweet, healthy twist.
- Sprinkle Crunch: Toss on some crushed nuts or granola for extra texture.
- Drizzle Sweetness: A little sugar-free chocolate syrup makes it feel decadent.
- Scoop into a Cone: Serve it in a waffle cone for a classic ice cream vibe.
- Pair with Dessert: Enjoy it with a warm brownie for a hot-cold combo.
How to Store Dash My Mug Protein Ice Cream
Storing your Dash My Mug Protein Ice Cream is super easy. If you don’t eat it all right away, just pop the mug back in the freezer.
Cover it with the lid or some plastic wrap to keep air out and prevent ice crystals. It’ll stay good for about a week, but I bet you’ll finish it sooner!
If it gets too hard, let it sit at room temperature for 5-10 minutes before scooping. I like to keep the mug in the freezer all the time so it’s ready for the next batch.
Just make sure to clean it after you’re done to avoid any leftover flavors mixing in next time.
Dash My Mug Protein Ice Cream Recipe FAQs
1. Can I use a different protein powder flavor?
Yes, you can! I’ve tried chocolate and strawberry protein powders, and they both work great. Just make sure the powder blends well with milk and cream. If you use an unflavored one, add a bit more vanilla extract or sweetener to boost the taste. Stick to plant-based or casein protein for a creamier texture, as whey can make it icy. Experiment with your favorite flavor to make it your own!
2. Why is my ice cream too soft?
If your ice cream is too soft, the mug might not be cold enough. Make sure it’s frozen for at least 24 hours at 0°F or colder. Also, chilling the mixture before churning helps. If it’s still soft after 20 minutes, pop it in the freezer for 1-2 hours. I’ve found that a quick freeze firms it up perfectly!
3. Can I double the recipe?
The Dash My Mug is small, so doubling might overflow it. I stick to the single batch (about 1 cup). If you have the Dash My Pint, you can double it and churn for 20-30 minutes. Otherwise, make two separate batches in the mug. It’s worth it for extra ice cream!
4. How do I clean the Dash My Mug Ice Cream Maker?
Cleaning is a breeze! After eating, rinse the paddle and lid with warm water and mild soap. The mug can go in the dishwasher, but I hand-wash it to keep it in top shape. Dry everything well before storing. I always clean right after using it to avoid sticky messes.
5. Can I skip the sweetener?
You can, but the ice cream might taste a bit flat. The sweetener balances the protein powder’s flavor. If you want less sweetness, try half the amount or use a naturally sweet mix-in like mashed banana. I’ve skipped it before with fruit-based mix-ins, and it still tasted great!
Dash My Mug Protein Ice Cream Recipe

Make creamy protein ice cream in just 25 minutes churn time with this Dash My Mug recipe—high protein, low carb, and incredibly easy to prepare!
Ingredients
- Whole Milk: ½ cup
- Heavy Cream: ½ cup
- Vanilla Protein Powder: 1 scoop (about 30g)
- Granulated Sweetener (e.g., monk fruit): 2 tablespoons
- Vanilla Extract: ½ teaspoon
- Salt: Pinch
- Optional Mix-Ins (e.g., chocolate chips, fruit): ¼ cup
Instructions
Step 1 | Freeze the Mug
First, put the Dash My Mug cooling bowl in the freezer for at least 24 hours. Keep it upright, not on its side. Your freezer should be at 0°F or colder. I usually leave mine in the freezer all the time so it’s ready whenever I want ice cream.
Step 2 | Mix the Base
In a small bowl or liquid measuring cup, pour in ½ cup of whole milk. Add 2 tablespoons of granulated sweetener (I use monk fruit). Whisk it well until the sweetener completely dissolves. This takes about a minute. Then, add ½ cup of heavy cream, 1 scoop of vanilla protein powder, ½ teaspoon of vanilla extract, and a pinch of salt. Whisk everything together until it’s smooth and there are no lumps. I make sure to mix it well so the protein powder doesn’t clump.
Step 3 | Chill the Mixture
Pop the mixture in the fridge for about 2 hours. This helps it churn better and gives you a creamier texture. If you’re in a rush, you can skip this, but I find chilling makes a big difference.
Step 4 | Set Up the Ice Cream Maker
Take the mug out of the freezer and place it on a flat surface, like your kitchen counter. Attach the motor to the lid until it clicks into place. Then, snap the paddle into the slot on the bottom of the motor. Lower the lid with the motor and paddle onto the mug, lining up the pins with the notches on the mug’s locking base. Twist it clockwise to lock it in.
Step 5 | Start Churning
Plug in the Dash My Mug Ice Cream Maker and press the power switch. The paddle will start spinning. Slowly pour your chilled mixture through the ingredient chute while the motor is running. I pour it in a steady stream to avoid spills.
Step 6 | Add Mix-Ins (Optional)
If you want mix-ins like chocolate chips or fruit, add about ¼ cup through the chute during the last 5 minutes of churning. This way, they mix in evenly without sinking to the bottom. I love adding dark chocolate chips for a little crunch!
Step 7 | Churn Until Done
Let the machine churn for 15-20 minutes, or until the ice cream looks like soft-serve. You’ll know it’s ready when it’s thick and creamy. If you want it firmer, pop the mug in the freezer for 1-2 hours.
Step 8 | Serve and Enjoy
Turn off the motor and twist the lid counterclockwise to unlock it. Lift off the lid, and the paddle will stay in the ice cream to keep things tidy. Grab a spoon and dig in right from the mug! It’s so fun to eat it straight from the maker.
Nutrition Information:
Serving Size:
1Amount Per Serving: Calories: 310Total Fat: 24gSaturated Fat: 14gCholesterol: 90mgSodium: 120mgCarbohydrates: 6gSugar: 3gProtein: 20g
Did you make this Dash My Mug Protein Ice Cream Recipe? Please leave a ⭐ rating and review!


Leave a Reply