
In summertime, nothing makes me happier than a cold, creamy bite of soft serve ice cream. When I was a kid, I always waited for the sound of the ice cream truck so I could grab a cone.
Now, soft serve is everywhere—restaurants, bars, even gas stations. But still, not all soft serve tastes the same.
My daughter is just like me—she loves ice cream. But going out every time she asks for it? That’s not always possible. So I started making it at home.
Out of all the soft serves I’ve tried, the one from Dairy Queen has the best taste and texture. It’s smooth, creamy, and melts just right in your mouth.
Today, I’m excited to share my Dairy Queen Soft Serve Ice Cream Recipe that I make at home. It’s creamy, sweet, and super easy to make.

What Makes Dairy Queen Soft Serve Ice Cream Unique!
There’s something about the Dairy Queen version that hits different. It’s not just cold and creamy—it has a smooth, soft texture that almost feels like velvet on your tongue.
It melts slowly and tastes rich, but not too heavy. The sweetness is just right. Not too sugary, not bland.
What really makes it special is how it stays soft even after freezing. Most homemade ice cream gets icy or hard.
But Dairy Queen-style soft serve keeps that fluffy, airy texture. It holds its swirl and still feels light when you eat it.
Dairy Queen Soft Serve Ice Cream Ingredients
Here’s what you need to make this creamy treat. Each ingredient plays a big role in getting that Dairy Queen taste and texture.
- Whole Milk (2 cups): This is the main liquid that makes your soft serve creamy but not too heavy. Whole milk has just the right amount of fat for a rich flavor. Skim or low-fat milk won’t give you the same smooth result, so stick with whole milk.
- Heavy Cream (1 cup): This adds that velvety, melt-in-your-mouth feel. Heavy cream makes the soft serve extra smooth and gives it that luxurious texture you love at Dairy Queen. Don’t swap it for half-and-half—it’s not the same!
- Granulated Sugar (3/4 cup): Sugar does two jobs: it sweetens the ice cream and keeps it soft when it freezes. This amount is perfect for a sweet but not overpowering taste. You can use regular white sugar from any store.
- Salt (1/4 teaspoon): A tiny bit of salt makes all the flavors pop. It balances the sweetness and brings out the vanilla. You won’t taste the salt, but it makes a big difference. Use regular table salt.
- Vanilla Extract (2 teaspoons): This gives your soft serve that classic Dairy Queen flavor. Pure vanilla extract is best because it tastes real and strong. Avoid imitation vanilla—it’s weaker and can taste fake.
- Nonfat Dry Milk Powder (1/4 cup): This is the secret to that super smooth texture. Dry milk powder thickens the mix and stops it from getting icy. You can find it in the baking aisle of most grocery stores.
- Dry Ice (2 pounds): Dry ice freezes the mixture fast to make it fluffy and soft. It’s what gives you that perfect soft serve texture. You can buy it at many grocery stores for about $2 per pound. Handle it carefully—it’s super cold!
Helpful Swaps
- For Whole Milk: If you don’t have whole milk, you can use 2% milk mixed with a little extra heavy cream (about 2 tablespoons more).
- For Heavy Cream: Half-and-half can work in a pinch, but your soft serve won’t be quite as rich. You could also use evaporated milk for a different but still yummy flavor.
- For Dry Milk Powder: If you can’t find nonfat dry milk powder, you can use whole milk powder, but reduce the amount to 3 tablespoons.
- For Vanilla Extract: You can swap this for vanilla bean paste for little specks of vanilla throughout your ice cream. Use the same amount.
- For Dry Ice: If you can’t get dry ice, you can make this in a regular ice cream maker, but the texture won’t be exactly like soft serve. It’ll still taste great though!
- Add-ins: Feel free to mix in some chocolate chips, crushed cookies, or fruit for different flavors once the ice cream is almost frozen.
Kitchen Equipment Needed
Here’s what I use to make this recipe at home:
- Blender – To mix the milk, cream, sugar, and other ingredients.
- Kitchen Scale – Helpful for measuring dry ice and dry milk powder.
- Stand Mixer or Hand Mixer – Needed for mixing in the dry ice. A stand mixer is easier, but both work.
- Large Mixing Bowl – Big enough to mix without spilling.
- Heavy Rag or Apron – For breaking up dry ice safely.
- Piping Bag (Optional) – To swirl the ice cream like they do at Dairy Queen.
How To Make Dairy Queen Soft Serve Ice Cream
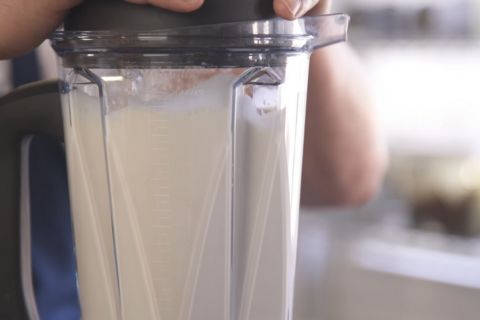
Step 1 | Blend the Base Ingredients
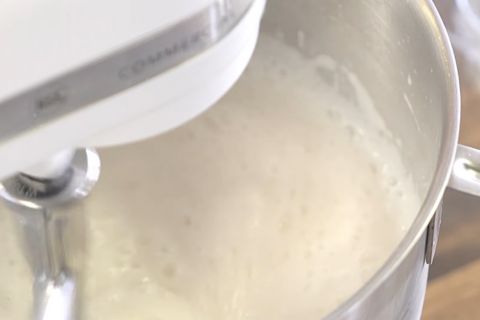
Place your blender on a flat surface. Pour in the milk, cream, sugar, salt, vanilla, and dry milk powder. Blend on high for about 1 minute until it’s super smooth. It should look like a creamy liquid with no lumps.
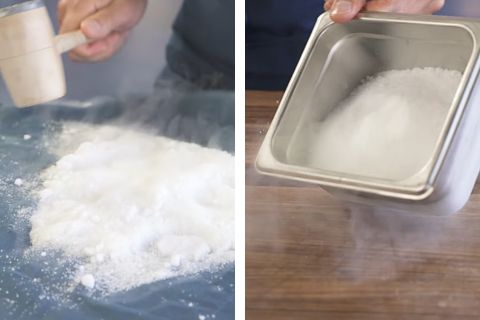
Step 2 | Prepare the Dry Ice
Wrap the dry ice in a heavy rag or apron. Use a hammer or rolling pin to gently smash it into small, sandy bits. You want it to look like coarse sand, not big chunks. Be careful—dry ice is very cold, so don’t touch it with bare hands.
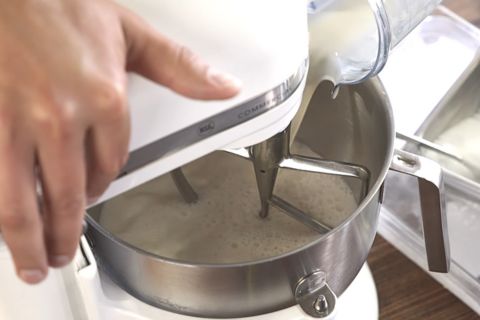
Step 3 | Set Up the Mixer
Pour the blended mixture into a large bowl or the bowl of a stand mixer. If you’re using a hand mixer, make sure the bowl is deep enough to avoid splashes.
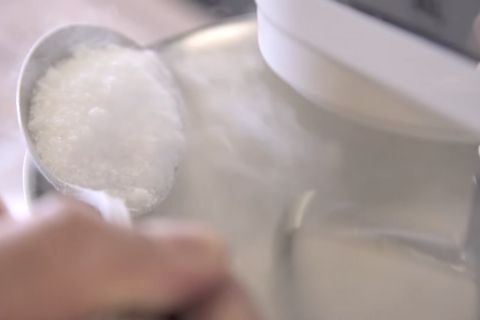
Step 4 | Churn with Dry Ice
Start the mixer on low speed. Sprinkle in a small amount of the dry ice (about a tablespoon at a time) while the mixer runs. Go slow—this is important! The mixture will start to bubble and look frothy, like a milkshake. That’s normal. Keep adding dry ice little by little over 5-7 minutes.
Step 5 | Watch It Thicken
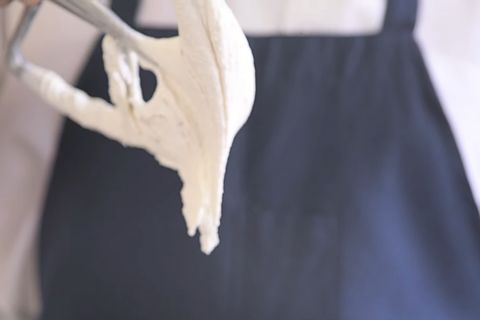
As you add more dry ice, the mixture will get colder and start to thicken. It’ll go from frothy to smooth and creamy. Keep mixing until it looks like soft serve—thick enough to hold a swirl but still soft. This usually takes about 10 minutes total.
Step 6 | Check the Texture
Stop the mixer and check the texture. It should be smooth and creamy, not icy or hard. If it’s too soft, add a bit more dry ice and mix for another minute or two.
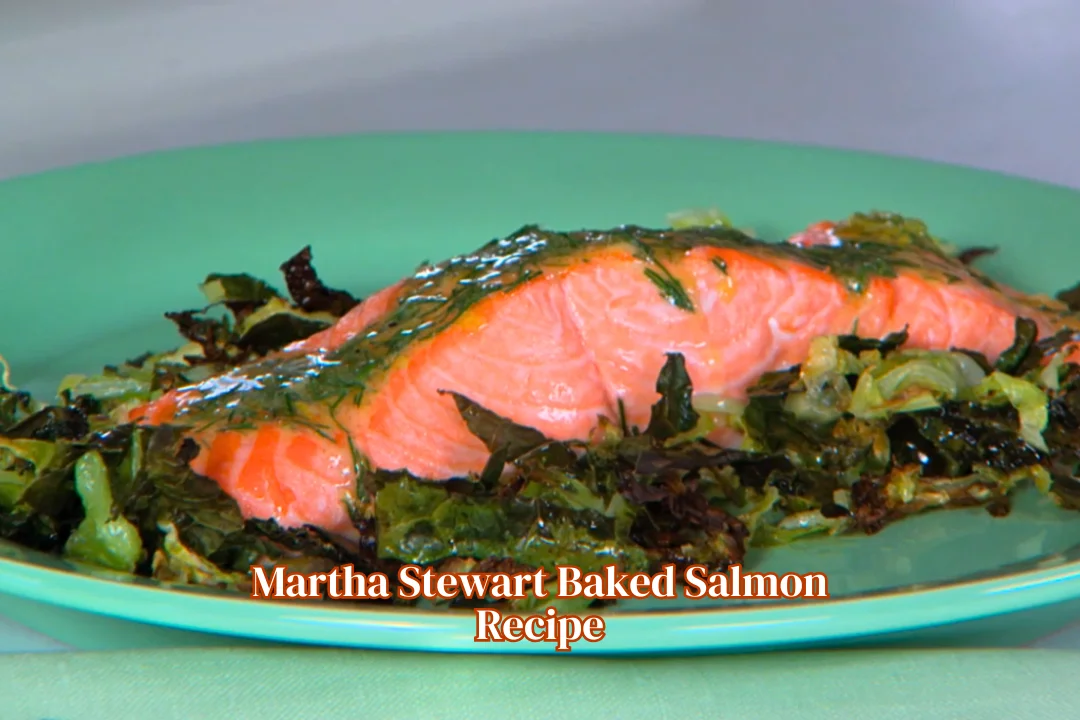
Step 7 | Serve It Up
Scoop it into a cup or cone. Use a piping bag if you want that Dairy Queen swirl. Add sprinkles or syrup on top if you like.

Ice Cream Perfection Tips
- Room Temperature Ingredients: Make sure your milk and heavy cream aren’t super cold from the fridge. Let them sit out for about 15-20 minutes before starting. This helps everything blend better.
- Don’t Rush the Dry Ice: Adding the dry ice too fast can make your mixture overflow and create a huge mess. Patience is key!
- Watch for Fizzing: Make sure all the dry ice has completely dissolved before eating. If it tastes fizzy or too cold, let it sit for another minute.
- Perfect Swirl Technique: To get that perfect DQ swirl, start from the outside edge of your cone or cup and work your way inward and upward in a circular motion.
- Keep It Moving: Don’t stop the mixer while adding dry ice or you might get frozen chunks in your soft serve.
Make-Ahead & Storage Tips for Homemade Soft Serve
You can easily make this homemade Dairy Queen Soft Serve Ice Cream ahead of time:
Make-Ahead: Prepare the ice cream base a day before and store it in the fridge. Then, churn it with dry ice just before serving for that fresh, perfect soft serve texture.
Storage: If you have leftovers, transfer the soft serve to an airtight container. Press plastic wrap directly on top to prevent ice crystals, then seal with a lid.
Freezing & Softening: It will firm up in the freezer. To enjoy, let it sit at room temperature for 15-20 minutes, or microwave for 10 seconds to soften. You can also blend it briefly to restore the soft serve texture.
This ice cream stays good in the freezer for up to 2 weeks, though it usually doesn’t last that long!
Dairy Queen Soft Serve Ice Cream Recipe FAQs
1. Where do I get dry ice?
Most grocery stores sell it—check the customer service desk. It’s about $2 a pound. Call ahead to make sure they have it. You’ll need 2 pounds for this recipe.
2. How do I get the classic Dairy Queen swirl?
For the famous swirl, scoop the soft serve into a piping bag with a round tip. Hold it upright over the cone or cup, squeeze gently, and spin your wrist as you pull up. That’s how you get those pretty, tall swirls!
3. Why is my homemade soft serve icy instead of creamy?
If your soft serve is icy instead of creamy, it could be due to a few things: adding dry ice too quickly, skipping milk powder, not using enough fat (like whole milk and cream), or over-mixing. Add dry ice slowly while stirring, include milk powder, use full-fat dairy, and mix just until smooth.
4. Can I add flavors like chocolate?
Absolutely! For chocolate soft serve, add 2 tablespoons of cocoa powder to the blender with the other ingredients. You can also mix in a teaspoon of strawberry extract for a fruity twist. Just don’t add too much extra liquid, or it’ll mess up the texture.
Dairy Queen Soft Serve Ice Cream Recipe

Make Dairy Queen Soft Serve Ice Cream at home in just 25 minutes! Creamy, smooth, and easy—perfect for summer treats your family will love.
Ingredients
- Whole Milk – 2 cups
- Heavy Cream – 1 cup
- Granulated Sugar – 3/4 cup
- Salt – 1/4 teaspoon
- Vanilla Extract – 2 teaspoons
- Nonfat Dry Milk Powder – 1/4 cup
- Dry Ice – 2 pounds (crushed into small bits for churning)
Instructions
Step 1 | Blend the Base Ingredients
Place your blender on a flat surface. Pour in the milk, cream, sugar, salt, vanilla, and dry milk powder. Blend on high for about 1 minute until it’s super smooth. It should look like a creamy liquid with no lumps.
Step 2 | Prepare the Dry Ice
Wrap the dry ice in a heavy rag or apron. Use a hammer or rolling pin to gently smash it into small, sandy bits. You want it to look like coarse sand, not big chunks. Be careful—dry ice is very cold, so don’t touch it with bare hands.
Step 3 | Set Up the Mixer
Pour the blended mixture into a large bowl or the bowl of a stand mixer. If you’re using a hand mixer, make sure the bowl is deep enough to avoid splashes.
Step 4 | Churn with Dry Ice
Start the mixer on low speed. Sprinkle in a small amount of the dry ice (about a tablespoon at a time) while the mixer runs. Go slow—this is important! The mixture will start to bubble and look frothy, like a milkshake. That’s normal. Keep adding dry ice little by little over 5-7 minutes.
Step 5 | Watch It Thicken
As you add more dry ice, the mixture will get colder and start to thicken. It’ll go from frothy to smooth and creamy. Keep mixing until it looks like soft serve—thick enough to hold a swirl but still soft. This usually takes about 10 minutes total.
Step 6 | Check the Texture
Stop the mixer and check the texture. It should be smooth and creamy, not icy or hard. If it’s too soft, add a bit more dry ice and mix for another minute or two.
Step 7 | Serve It Up
Scoop it into a cup or cone. Use a piping bag if you want that Dairy Queen swirl. Add sprinkles or syrup on top if you like.
Nutrition Information:
Yield:
6Serving Size:
1/2 cup per servingAmount Per Serving: Calories: 290Total Fat: 19gSaturated Fat: 12gCholesterol: 70mgSodium: 90mgCarbohydrates: 25gFiber: 0gSugar: 23gProtein: 5g
I hope you’re excited to try this Dairy Queen Soft Serve Ice Cream Recipe! It’s a fun, easy way to bring that creamy, swirly treat home.
My daughter and I love making it together—it’s like a little summer party in our kitchen. You’ll love how simple and tasty it is. Grab your ingredients and give it a swirl!
Did you make this recipe? Please leave a ⭐ rating and review!


Leave a Reply