
Remember when dinner meant just one pan, simple ingredients, and food that made your house smell amazing? My grandma used to make these meals all the time.
She’d pull out her trusty skillet or roasting pan, toss everything in, and we’d have dinner ready without a mountain of dishes to wash. These one-pan dinners were staples in kitchens across America.
But somewhere along the way, we forgot about them. Maybe we got busy with fancy recipes or thought simple meant boring. But I’m here to tell you these forgotten gems deserve a comeback.
They’re easy, delicious, and perfect for busy weeknights.
Today, I’m sharing 13+ one-pan dinners that no one makes anymore. Trust me, your family will thank you for bringing these classics back to the table.

Why These One-Pan Dinners Disappeared from Our Tables
Life got complicated. We started thinking dinner needed to be fancy or Instagram-worthy. But the truth is, these simple one-pan meals fed families for generations. They worked then, and they still work now.
These recipes use basic ingredients you probably already have. No special equipment needed. Just one pan and some good food. Perfect for weeknights when you’re tired and don’t want to spend hours cooking or cleaning.
The Beauty of Forgotten One-Pan Classics
What makes these dinners so special? They’re forgiving. You can adjust ingredients based on what you have. They’re also budget-friendly and don’t require fancy cooking skills.
Your grandparents knew what they were doing. These meals brought families together without all the fuss. Let’s bring that simplicity back.

Simple One-Pan Wonders Cookbook
Stop spending hours cleaning up. Discover 100+ recipes that only use ONE pan!
Check Availability on AmazonClassic Pork Chops with Apples and Onions
I absolutely love this recipe because it reminds me of fall evenings at my grandmother’s house. The pork chops get so tender, and the apples add this wonderful sweet touch that balances the savory meat perfectly.
It’s one of those meals that looks fancy but takes almost no effort. The onions caramelize while everything cooks together, creating this incredible sauce. I make this when I want comfort food that feels special.
It’s also great for Sunday dinners when you want something homey. The smell alone makes everyone hungry. Best for those cozy nights when you want a meal that hugs you from the inside.

Serve: 4 | Prep Time: 10 minutes | Cook Time: 30 minutes | Total Time: 40 minutes
Ingredients:
- 4 bone-in pork chops (about 1 inch thick)
- 2 large apples, sliced
- 1 large onion, sliced
- 2 tablespoons butter
- 1 tablespoon olive oil
- 1 teaspoon dried thyme
- 1/2 teaspoon garlic powder
- Salt and pepper to taste
- 1/2 cup chicken broth
How To Make:
Season the Pork – Pat the pork chops dry with paper towels. Sprinkle both sides with salt, pepper, garlic powder, and thyme. Make sure to season generously because this is where your flavor starts.
Brown the Meat – Heat olive oil and 1 tablespoon butter in a large skillet over medium-high heat. Add pork chops and cook for 4 minutes on each side until golden brown. Don’t move them around too much. Let them get that nice crust. Remove and set aside on a plate.
Cook the Apples and Onions – In the same pan, add remaining butter. Toss in sliced onions and cook for 3 minutes until they start to soften. Add apple slices and cook for another 2 minutes, stirring occasionally.
Combine and Simmer – Pour in chicken broth and scrape up any brown bits from the bottom of the pan. These bits are pure flavor. Place pork chops back in the pan, nestling them among the apples and onions. Reduce heat to medium-low.
Finish Cooking – Cover the pan and let everything simmer for 15-20 minutes until pork chops reach an internal temperature of 145°F. The apples should be tender but not mushy. Spoon the apple and onion mixture over the chops before serving.
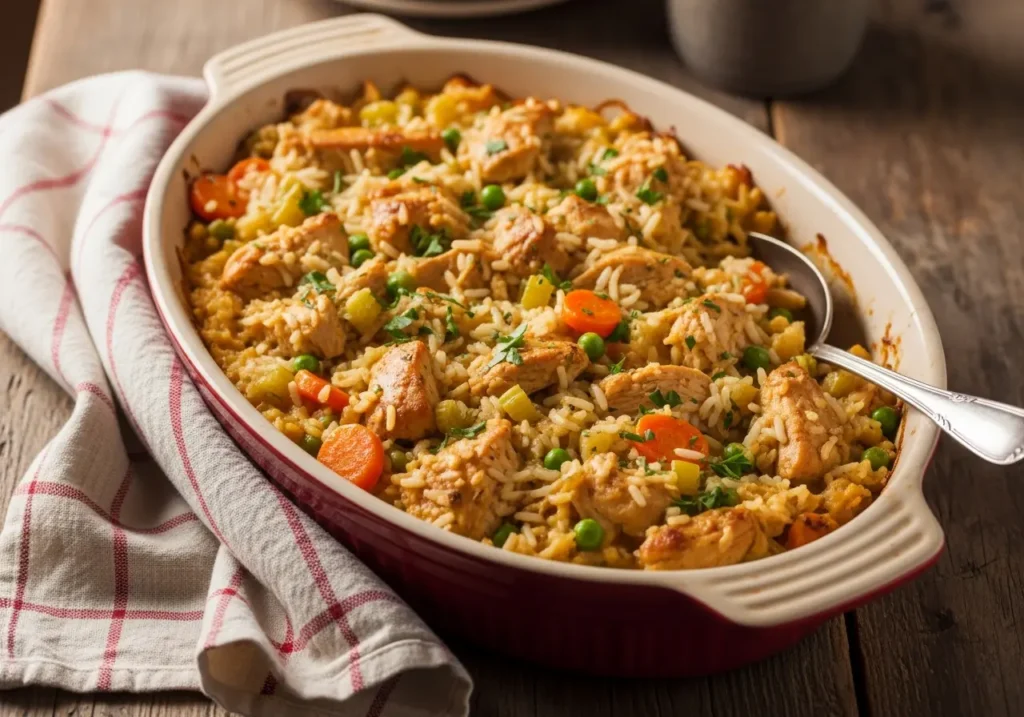
Old-Fashioned Chicken and Rice Bake
This is the ultimate comfort food that my mom made every Wednesday without fail. The rice soaks up all the chicken flavor and gets perfectly fluffy while everything bakes together.
I love how the chicken skin gets crispy on top while the rice stays moist underneath. It’s foolproof, which means even beginners can nail this recipe.
The best part is you can prep it in the morning and just pop it in the oven when you get home. It feeds a crowd and leftovers taste even better the next day.
This dish proves that simple ingredients can create something truly magical. Best for family gatherings or when you need a reliable weeknight meal that everyone will eat.
Serve: 6 | Prep Time: 15 minutes | Cook Time: 1 hour | Total Time: 1 hour 15 minutes
Ingredients:
- 6 chicken thighs (bone-in, skin-on)
- 1 1/2 cups long-grain white rice
- 3 cups chicken broth
- 1 can (10.5 oz) cream of mushroom soup
- 1 onion, diced
- 2 cloves garlic, minced
- 1 teaspoon paprika
- 1/2 teaspoon dried parsley
- Salt and pepper to taste
- 2 tablespoons butter, melted
How To Make:
Prepare the Rice Mixture – Preheat your oven to 350°F. In a 9×13 inch baking dish, combine rice, chicken broth, cream of mushroom soup, diced onion, and minced garlic. Stir everything together until well mixed. The soup might look lumpy but it will smooth out as it cooks.
Season the Chicken – Pat chicken thighs dry and season both sides with paprika, salt, and pepper. This helps create that crispy skin everyone loves. Don’t skip the drying step or your skin won’t crisp up properly.
Arrange in Pan – Place seasoned chicken thighs on top of the rice mixture, skin side up. Try to space them evenly so everything cooks at the same rate. The chicken will release juices that flavor the rice below.
Add Finishing Touches – Brush melted butter over the chicken skin and sprinkle with dried parsley. This helps with browning and adds extra flavor to the crispy skin.
Bake – Cover tightly with aluminum foil and bake for 45 minutes. Remove foil and bake for another 15 minutes until chicken skin is crispy and golden, and rice has absorbed all the liquid. Let it rest for 5 minutes before serving.
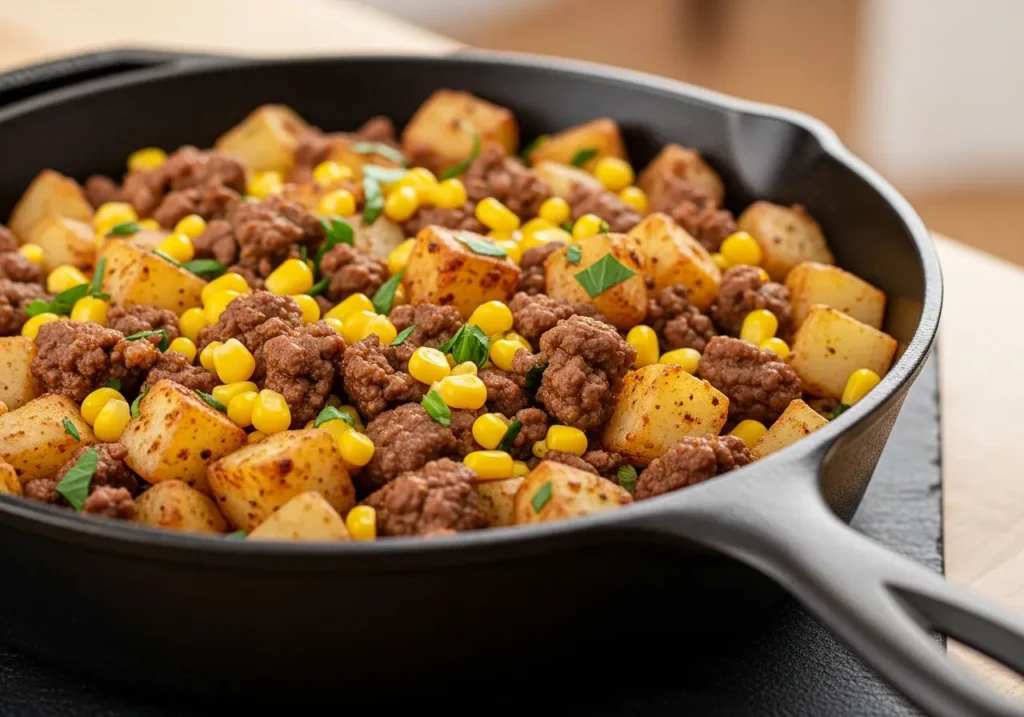
Hamburger Skillet with Potatoes and Corn
My kids request this meal at least twice a month because it’s their absolute favorite. It’s hearty, filling, and has everything you need in one pan.
I love that it uses ground beef, which is budget-friendly and cooks quickly. The potatoes get nice and crispy on the edges while staying tender inside. Adding corn gives it a little sweetness that balances the savory beef perfectly. This is one of those recipes where you can use whatever vegetables you have on hand.
It’s super flexible and forgiving. The whole thing comes together in about 30 minutes, which is perfect for busy nights. Best for families with picky eaters because there’s something everyone likes in this dish.
Serve: 5 | Prep Time: 10 minutes | Cook Time: 25 minutes | Total Time: 35 minutes
Ingredients:
- 1 pound ground beef
- 4 medium potatoes, diced into small cubes
- 1 can (15 oz) corn, drained
- 1 onion, chopped
- 2 cloves garlic, minced
- 1 teaspoon paprika
- 1/2 teaspoon cumin
- Salt and pepper to taste
- 1 cup shredded cheddar cheese
- 2 tablespoons vegetable oil
How To Make:
Cook the Potatoes – Heat vegetable oil in a large skillet over medium-high heat. Add diced potatoes and season with salt and pepper. Cook for 10-12 minutes, stirring occasionally, until they’re golden and almost tender. You want some crispy edges here.
Brown the Beef – Push potatoes to the side of the pan. Add ground beef to the empty space and break it up with a wooden spoon. Cook until no longer pink, about 5-6 minutes. Mix it with the potatoes as it cooks.
Add Aromatics – Stir in chopped onion and garlic. Cook for 2-3 minutes until the onion softens and everything smells amazing. The garlic should be fragrant but not burned.
Season and Add Corn – Sprinkle paprika and cumin over everything. Mix well so all the potatoes and beef get coated with spices. Add drained corn and stir to combine. Cook for another 3-4 minutes to heat the corn through.
Finish with Cheese – Sprinkle shredded cheddar cheese over the top. Turn off the heat and cover the pan with a lid for 2 minutes. The cheese will melt from the residual heat. Serve hot right from the skillet.
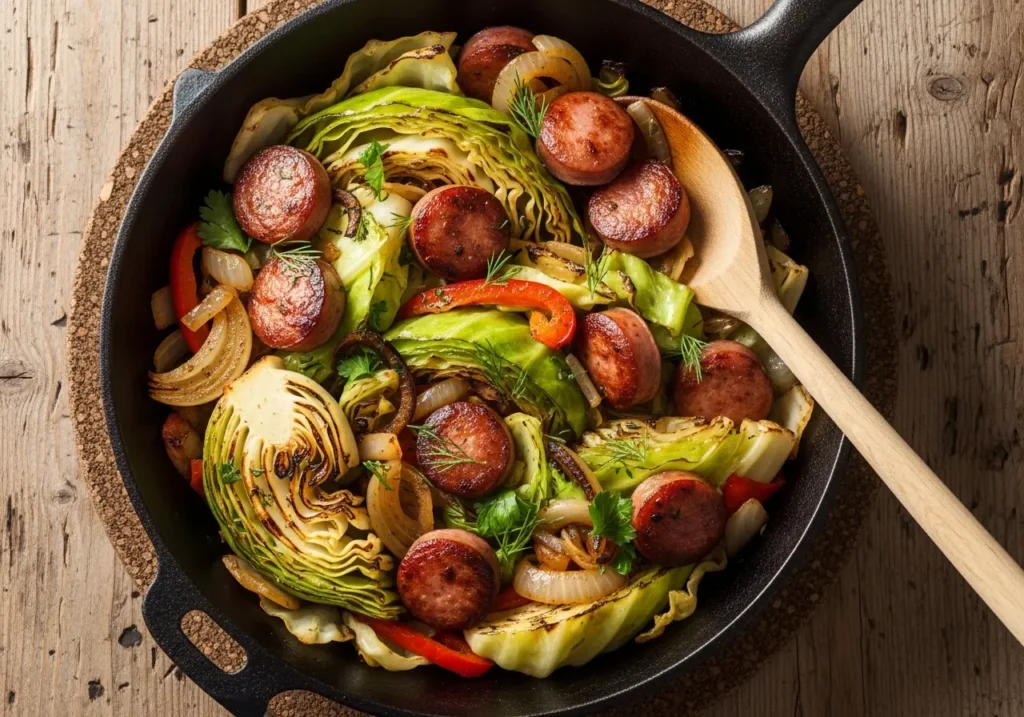
Sausage and Cabbage Skillet
This recipe brings back memories of my Polish grandmother’s kitchen. The sausage and cabbage combination is so classic and delicious.
I love how the cabbage gets soft and sweet as it cooks down, soaking up all the sausage flavor. It’s incredibly filling and uses just a few simple ingredients that don’t cost much. This is one of those meals that tastes like it took hours but actually comes together in less than 30 minutes.
The smoked sausage adds so much flavor you barely need any other seasonings. It’s also really good for you with all that cabbage. Best for cold winter nights when you want something warm and satisfying without much effort.
Serve: 4 | Prep Time: 10 minutes | Cook Time: 20 minutes | Total Time: 30 minutes
Ingredients:
- 1 pound smoked sausage, sliced into rounds
- 1 medium head of cabbage, chopped
- 1 onion, sliced
- 3 cloves garlic, minced
- 1 tablespoon butter
- 1 teaspoon caraway seeds (optional)
- 1/2 teaspoon black pepper
- Salt to taste
- 1/4 cup chicken broth
How To Make:
Brown the Sausage – Heat a large skillet over medium-high heat. Add sliced sausage and cook for 4-5 minutes until browned on both sides. The sausage will release some fat, which is perfect for cooking the vegetables. Remove sausage and set aside.
Soften the Onion – In the same pan with the sausage drippings, add butter and sliced onion. Cook for 3 minutes until the onion starts to turn translucent. Stir occasionally so it doesn’t burn.
Add Cabbage – Toss in chopped cabbage and minced garlic. It will look like a huge pile but don’t worry, it cooks down a lot. Stir everything together and season with salt, pepper, and caraway seeds if using.
Steam and Cook – Pour in chicken broth and cover the pan with a lid. Let the cabbage steam for 8-10 minutes, stirring occasionally. It should become tender but still have a little bite to it.
Combine and Heat – Add the sausage back to the pan. Stir everything together and cook uncovered for another 2-3 minutes until any excess liquid evaporates. Taste and adjust seasoning if needed before serving.
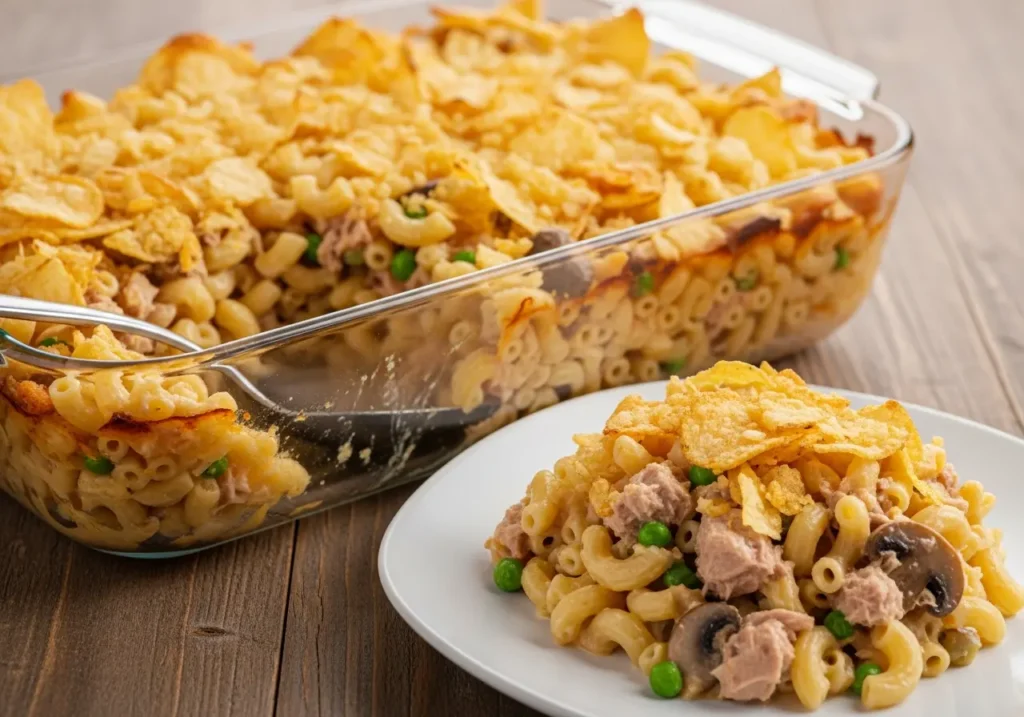
Tuna Noodle Casserole
I’ll admit, this dish got a bad reputation over the years, but when done right, it’s absolutely delicious. My aunt made this every Friday, and we all looked forward to it. The creamy sauce, tender noodles, and chunks of tuna create this comforting combination that just works.
I love adding peas for a pop of color and extra nutrition. It’s one of those recipes you can make with pantry staples, which is perfect for those nights when you haven’t been grocery shopping. The crispy topping is what takes this from good to great.
Kids love it, adults love it, and it’s budget-friendly too. Best for busy weeknights or when you need to feed a crowd without spending a fortune.
Serve: 6 | Prep Time: 15 minutes | Cook Time: 30 minutes | Total Time: 45 minutes
Ingredients:
- 12 oz egg noodles
- 2 cans (5 oz each) tuna, drained
- 1 can (10.5 oz) cream of mushroom soup
- 1 cup frozen peas
- 1 cup milk
- 1 cup shredded cheddar cheese
- 1/2 cup breadcrumbs
- 2 tablespoons butter, melted
- Salt and pepper to taste
- 1/2 teaspoon garlic powder
How To Make:
Cook the Noodles – Preheat oven to 375°F. Cook egg noodles according to package directions but reduce cooking time by 2 minutes. They should be slightly undercooked because they’ll continue cooking in the oven. Drain well and return to the pot.
Make the Sauce – In the pot with the noodles, add cream of mushroom soup, milk, drained tuna, frozen peas, and half the shredded cheese. Stir everything together until well combined. Season with salt, pepper, and garlic powder.
Transfer to Baking Dish – Pour the noodle mixture into a greased 9×13 inch baking dish. Spread it out evenly so it cooks uniformly. The mixture should look creamy but not soupy.
Add Topping – Mix breadcrumbs with melted butter in a small bowl. Sprinkle this mixture over the noodles, then top with remaining cheese. The butter helps the breadcrumbs get golden and crispy.
Bake – Place in the oven and bake for 25-30 minutes until the top is golden brown and the casserole is bubbling around the edges. Let it sit for 5 minutes before serving so it sets up a bit.
Liver and Onions
Okay, I know what you’re thinking, but hear me out. This dish has completely disappeared from most tables, and that’s a shame. My grandfather loved this meal, and once I tried it made properly, I understood why.
The key is not overcooking the liver, which makes it tough and bitter. When done right, it’s tender and flavorful. The caramelized onions are sweet and balance the rich liver perfectly. It’s also incredibly nutritious and packed with iron.
This recipe is budget-friendly since liver costs very little. I won’t lie and say everyone will love it, but it deserves a chance. Best for adventurous eaters who want to try something traditional and nutritious.
Serve: 4 | Prep Time: 10 minutes | Cook Time: 20 minutes | Total Time: 30 minutes
Ingredients:
- 1 pound beef liver, sliced
- 2 large onions, sliced into rings
- 1/2 cup all-purpose flour
- 4 tablespoons butter
- 2 tablespoons vegetable oil
- 1/2 cup beef broth
- Salt and pepper to taste
- 1/2 teaspoon dried sage
How To Make:
Prep the Liver – Rinse liver slices and pat them completely dry with paper towels. Any excess moisture will prevent proper browning. Season both sides with salt and pepper, then lightly coat each slice in flour. Shake off any excess.
Caramelize the Onions – Heat 2 tablespoons butter and oil in a large skillet over medium heat. Add sliced onions and cook for 10-12 minutes, stirring occasionally, until golden brown and sweet. This step is important for flavor. Remove onions and set aside.
Cook the Liver – Add remaining butter to the same pan and increase heat to medium-high. Add liver slices in a single layer, working in batches if needed. Cook for 2-3 minutes per side. The liver should be browned outside but still slightly pink inside.
Make the Sauce – Return all liver to the pan. Sprinkle with sage and pour in beef broth. Let it simmer for 1-2 minutes, spooning the sauce over the liver. Don’t overcook or the liver will get tough.
Finish the Dish – Add the caramelized onions back to the pan. Toss everything together and cook for just 1 more minute to heat through. Serve immediately while the liver is still tender.
Salisbury Steak with Mushroom Gravy
This is pure nostalgic comfort food that reminds me of TV dinners, but a million times better. I make my own version with real ingredients, and it’s so much more delicious than anything from a box.
The beef patties are juicy and flavorful, and that mushroom gravy is absolutely incredible. I love serving this over mashed potatoes or egg noodles to soak up all that rich sauce. It looks fancy enough for company but easy enough for a weeknight. The mushrooms add a nice earthy flavor that pairs perfectly with the beef.
This is one of those meals that makes everyone happy. Best for those nights when you want something hearty and satisfying that feels like a hug on a plate.
Serve: 4 | Prep Time: 15 minutes | Cook Time: 25 minutes | Total Time: 40 minutes
Ingredients:
- 1 pound ground beef
- 1/3 cup breadcrumbs
- 1 egg
- 2 tablespoons ketchup
- 1 teaspoon Worcestershire sauce
- 8 oz mushrooms, sliced
- 1 onion, sliced
- 2 cups beef broth
- 2 tablespoons flour
- 2 tablespoons butter
- Salt and pepper to taste
How To Make:
Form the Patties – In a bowl, mix ground beef, breadcrumbs, egg, ketchup, Worcestershire sauce, salt, and pepper. Mix with your hands until just combined, but don’t overmix or the patties will be tough. Form into 4 oval-shaped patties about 3/4 inch thick.
Brown the Steaks – Heat butter in a large skillet over medium-high heat. Add patties and cook for 4 minutes per side until nicely browned. They don’t need to be cooked through yet. Remove and set aside on a plate.
Cook Vegetables – In the same pan, add sliced onion and mushrooms. Cook for 5 minutes until the mushrooms release their moisture and the onions soften. The vegetables will pick up all the delicious browned bits from the bottom of the pan.
Make the Gravy – Sprinkle flour over the vegetables and stir for 1 minute. Slowly pour in beef broth while stirring constantly to prevent lumps. The gravy will start to thicken as it heats up.
Simmer Together – Return the patties to the pan, nestling them into the gravy. Reduce heat to medium-low and simmer for 10-12 minutes until the patties are cooked through and the gravy is thick and rich. Spoon gravy over the steaks before serving.
Corned Beef Hash with Eggs
This breakfast-for-dinner classic has almost vanished from modern tables, and I have no idea why. I grew up eating this on lazy Sunday mornings, and now I make it for dinner when I want something hearty and comforting.
The crispy potatoes mixed with tender corned beef create this amazing texture combination. I love how the egg yolk runs into the hash and makes everything even more delicious. You can use leftover corned beef or buy it canned, both work great. The key is getting those potatoes really crispy on the bottom before stirring. It’s filling, satisfying, and uses simple ingredients.
This is one of those dishes that tastes better than it looks. Best for weekend brunches or when you want a stick-to-your-ribs dinner that comes together quickly.

Serve: 4 | Prep Time: 10 minutes | Cook Time: 25 minutes | Total Time: 35 minutes
Ingredients:
- 12 oz cooked corned beef, diced
- 3 large potatoes, peeled and diced small
- 1 onion, chopped
- 1 bell pepper, diced
- 4 eggs
- 3 tablespoons vegetable oil
- 2 tablespoons butter
- Salt and pepper to taste
- 1/2 teaspoon paprika
- Fresh parsley for garnish
How To Make:
Prep the Potatoes – Boil diced potatoes in salted water for 5 minutes until slightly tender but not fully cooked. Drain well and let them dry for a minute. This step helps them get extra crispy when you fry them.
Start the Hash – Heat vegetable oil in a large cast iron skillet over medium-high heat. Add the parboiled potatoes in an even layer. Let them cook without stirring for 5-6 minutes until the bottom gets golden and crispy. This is where the magic happens.
Add Vegetables and Meat – Flip the potatoes and add chopped onion and bell pepper. Cook for 3-4 minutes, stirring occasionally. Add diced corned beef and season everything with salt, pepper, and paprika. Mix well and press down with a spatula to help everything crisp up.
Create Wells for Eggs – Make 4 indentations in the hash using the back of a spoon. Add a small pat of butter to each well. Crack an egg into each well. The butter helps the eggs cook evenly and adds flavor.
Finish Cooking – Reduce heat to medium and cover the skillet with a lid. Cook for 5-7 minutes until egg whites are set but yolks are still runny, or longer if you prefer hard yolks. Garnish with fresh parsley and serve hot right from the skillet.
Shepherd’s Pie in a Skillet
My Irish grandmother made this every Thursday without fail, and the whole house smelled incredible. I love this one-pan version because it gives you all the comfort of traditional shepherd’s pie without dirtying multiple dishes.
The seasoned ground lamb topped with creamy mashed potatoes is pure comfort food. If you can’t find lamb, ground beef works too, though technically that makes it cottage pie. The vegetables add nutrition and stretch the meat further, making it budget-friendly.
Getting that golden crust on top of the potatoes is the best part. It’s hearty enough to feed hungry family members and leftovers reheat beautifully. Best for cold evenings when you want something warm and filling that brings everyone to the table.
Serve: 6 | Prep Time: 20 minutes | Cook Time: 35 minutes | Total Time: 55 minutes
Ingredients:
- 1 pound ground lamb (or ground beef)
- 4 cups mashed potatoes (prepared)
- 1 onion, diced
- 2 carrots, diced
- 1 cup frozen peas
- 2 cloves garlic, minced
- 2 tablespoons tomato paste
- 1 cup beef broth
- 2 tablespoons flour
- 2 tablespoons butter
- 1 teaspoon Worcestershire sauce
- 1/2 teaspoon dried thyme
- Salt and pepper to taste
- 1/2 cup shredded cheese (optional)
How To Make:
Brown the Meat – Preheat your broiler. Heat a large oven-safe skillet over medium-high heat. Add ground lamb and cook for 5-6 minutes, breaking it up with a spoon until browned. Drain excess fat if there’s a lot, leaving about 1 tablespoon in the pan.
Cook the Vegetables – Add diced onion and carrots to the meat. Cook for 5 minutes until vegetables start to soften. The carrots should still have a slight bite. Add minced garlic and cook for another minute until fragrant.
Build the Sauce – Stir in flour and cook for 1 minute. Add tomato paste, beef broth, Worcestershire sauce, and thyme. Mix everything well and bring to a simmer. The mixture should thicken slightly. Add frozen peas and cook for 2 more minutes.
Add Potato Topping – Spread mashed potatoes evenly over the meat mixture, starting from the edges and working toward the center. Use a fork to create peaks and ridges in the potatoes, which will brown nicely. Dot the top with small pieces of butter. Sprinkle with cheese if using.
Broil Until Golden – Place the skillet under the broiler for 5-7 minutes, watching carefully, until the potato peaks turn golden brown. The edges might get a little crispy, which is delicious. Let it rest for 5 minutes before serving so the filling sets up.
Swedish Meatballs with Noodles
I first had these at a church potluck, and I’ve been hooked ever since. The creamy gravy with a hint of nutmeg makes these meatballs special and different from Italian meatballs. I love serving them over egg noodles, which soak up all that delicious sauce.
They’re tender, flavorful, and the whole dish comes together in one pan. My kids think they’re fancy, but they’re actually super easy to make.
The key is using both beef and pork for the meatballs, which keeps them moist and adds more flavor. This is comfort food at its finest. Best for Sunday dinners when you want something cozy and satisfying that feels a little special.
Serve: 4 | Prep Time: 20 minutes | Cook Time: 25 minutes | Total Time: 45 minutes
Ingredients:
- 1/2 pound ground beef
- 1/2 pound ground pork
- 1/2 cup breadcrumbs
- 1 egg
- 1/4 cup milk
- 1/4 teaspoon nutmeg
- 1/4 teaspoon allspice
- 2 tablespoons butter
- 2 tablespoons flour
- 2 cups beef broth
- 1/2 cup heavy cream
- 8 oz egg noodles
- Salt and pepper to taste
- Fresh parsley for garnish
How To Make:
Make the Meatballs – In a bowl, combine ground beef, ground pork, breadcrumbs, egg, milk, nutmeg, allspice, salt, and pepper. Mix gently with your hands until just combined. Roll into balls about 1 inch in diameter. You should get about 20 meatballs. Wet your hands slightly to prevent sticking.
Brown the Meatballs – Heat butter in a large skillet over medium heat. Add meatballs in batches, being careful not to crowd the pan. Brown them on all sides, about 6-8 minutes total. They don’t need to be fully cooked yet. Remove and set aside.
Create the Sauce – In the same pan, sprinkle flour into the remaining butter and drippings. Stir for 1 minute. Slowly whisk in beef broth, scraping up any browned bits from the bottom. The sauce will start to thicken as it heats.
Simmer Everything – Return meatballs to the pan and reduce heat to medium-low. Simmer for 10 minutes until meatballs are cooked through. Stir in heavy cream and cook for another 2-3 minutes. The sauce should be smooth and creamy. Taste and adjust seasoning.
Cook Noodles and Serve – While meatballs simmer, cook egg noodles according to package directions. Drain and add them directly to the skillet with the meatballs, or serve meatballs over noodles on plates. Toss gently to coat noodles with sauce. Garnish with fresh parsley.
Pork and Sauerkraut
This is a New Year’s tradition in my family, but honestly, it’s too good to make just once a year. The pork becomes incredibly tender and picks up all the tangy flavors from the sauerkraut. I love how simple this recipe is with just a few ingredients that transform into something amazing.
The sauerkraut mellows as it cooks and becomes sweet and savory instead of super sour. This dish is very forgiving and hard to mess up. You can use pork chops, pork shoulder, or even kielbasa. It’s one of those set-it-and-forget-it meals that fills your house with the most wonderful smell.
Best for cold weather when you want something hearty that practically cooks itself.
Serve: 5 | Prep Time: 10 minutes | Cook Time: 1 hour 15 minutes | Total Time: 1 hour 25 minutes
Ingredients:
- 2 pounds pork shoulder, cut into chunks
- 1 jar (32 oz) sauerkraut, drained
- 1 large onion, sliced
- 2 apples, peeled and sliced
- 1 cup chicken broth
- 2 tablespoons brown sugar
- 1 teaspoon caraway seeds
- 1 bay leaf
- Salt and pepper to taste
- 2 tablespoons vegetable oil
How To Make:
Brown the Pork – Season pork chunks with salt and pepper. Heat vegetable oil in a large Dutch oven or deep skillet over medium-high heat. Brown pork pieces on all sides, about 8-10 minutes total. Work in batches if needed. You want a nice golden color. Remove and set aside.
Layer the Ingredients – In the same pot, add half the drained sauerkraut. Place browned pork on top. Add sliced onions and apples over the pork. Top with remaining sauerkraut. This layering helps everything cook evenly and lets the flavors blend.
Add Seasonings – Sprinkle brown sugar and caraway seeds over everything. Tuck the bay leaf into the sauerkraut. Pour chicken broth around the edges of the pot. The liquid should come about halfway up the ingredients.
Simmer Low and Slow – Bring everything to a simmer, then reduce heat to low. Cover and cook for 1 hour, stirring once or twice. The pork should be very tender and easy to shred with a fork.
Final Steps – Remove bay leaf and taste for seasoning. The sauerkraut should be soft and sweet. If there’s too much liquid, uncover and simmer for a few more minutes to reduce it. Serve hot with the apples and onions spooned over the pork.
Corned Beef Hash with Eggs
This breakfast-for-dinner classic has almost vanished from modern tables, and I have no idea why. I grew up eating this on lazy Sunday mornings, and now I make it for dinner when I want something hearty and comforting.
The crispy potatoes mixed with tender corned beef create this amazing texture combination. I love how the egg yolk runs into the hash and makes everything even more delicious. You can use leftover corned beef or buy it canned, both work great. The key is getting those potatoes really crispy on the bottom before stirring.
It’s filling, satisfying, and uses simple ingredients. This is one of those dishes that tastes better than it looks. Best for weekend brunches or when you want a stick-to-your-ribs dinner that comes together quickly.
Serve: 4 | Prep Time: 10 minutes | Cook Time: 25 minutes | Total Time: 35 minutes
Ingredients:
- 12 oz cooked corned beef, diced
- 3 large potatoes, peeled and diced small
- 1 onion, chopped
- 1 bell pepper, diced
- 4 eggs
- 3 tablespoons vegetable oil
- 2 tablespoons butter
- Salt and pepper to taste
- 1/2 teaspoon paprika
- Fresh parsley for garnish
How To Make:
Prep the Potatoes – Boil diced potatoes in salted water for 5 minutes until slightly tender but not fully cooked. Drain well and let them dry for a minute. This step helps them get extra crispy when you fry them.
Start the Hash – Heat vegetable oil in a large cast iron skillet over medium-high heat. Add the parboiled potatoes in an even layer. Let them cook without stirring for 5-6 minutes until the bottom gets golden and crispy. This is where the magic happens.
Add Vegetables and Meat – Flip the potatoes and add chopped onion and bell pepper. Cook for 3-4 minutes, stirring occasionally. Add diced corned beef and season everything with salt, pepper, and paprika. Mix well and press down with a spatula to help everything crisp up.
Create Wells for Eggs – Make 4 indentations in the hash using the back of a spoon. Add a small pat of butter to each well. Crack an egg into each well. The butter helps the eggs cook evenly and adds flavor.
Finish Cooking – Reduce heat to medium and cover the skillet with a lid. Cook for 5-7 minutes until egg whites are set but yolks are still runny, or longer if you prefer hard yolks. Garnish with fresh parsley and serve hot right from the skillet.
Shepherd’s Pie in a Skillet
My Irish grandmother made this every Thursday without fail, and the whole house smelled incredible. I love this one-pan version because it gives you all the comfort of traditional shepherd’s pie without dirtying multiple dishes. The seasoned ground lamb topped with creamy mashed potatoes is pure comfort food.
If you can’t find lamb, ground beef works too, though technically that makes it cottage pie. The vegetables add nutrition and stretch the meat further, making it budget-friendly.
Getting that golden crust on top of the potatoes is the best part. It’s hearty enough to feed hungry family members and leftovers reheat beautifully. Best for cold evenings when you want something warm and filling that brings everyone to the table.
Serve: 6 | Prep Time: 20 minutes | Cook Time: 35 minutes | Total Time: 55 minutes
Ingredients:
- 1 pound ground lamb (or ground beef)
- 4 cups mashed potatoes (prepared)
- 1 onion, diced
- 2 carrots, diced
- 1 cup frozen peas
- 2 cloves garlic, minced
- 2 tablespoons tomato paste
- 1 cup beef broth
- 2 tablespoons flour
- 2 tablespoons butter
- 1 teaspoon Worcestershire sauce
- 1/2 teaspoon dried thyme
- Salt and pepper to taste
- 1/2 cup shredded cheese (optional)
How To Make:
Brown the Meat – Preheat your broiler. Heat a large oven-safe skillet over medium-high heat. Add ground lamb and cook for 5-6 minutes, breaking it up with a spoon until browned. Drain excess fat if there’s a lot, leaving about 1 tablespoon in the pan.
Cook the Vegetables – Add diced onion and carrots to the meat. Cook for 5 minutes until vegetables start to soften. The carrots should still have a slight bite. Add minced garlic and cook for another minute until fragrant.
Build the Sauce – Stir in flour and cook for 1 minute. Add tomato paste, beef broth, Worcestershire sauce, and thyme. Mix everything well and bring to a simmer. The mixture should thicken slightly. Add frozen peas and cook for 2 more minutes.
Add Potato Topping – Spread mashed potatoes evenly over the meat mixture, starting from the edges and working toward the center. Use a fork to create peaks and ridges in the potatoes, which will brown nicely. Dot the top with small pieces of butter. Sprinkle with cheese if using.
Broil Until Golden – Place the skillet under the broiler for 5-7 minutes, watching carefully, until the potato peaks turn golden brown. The edges might get a little crispy, which is delicious. Let it rest for 5 minutes before serving so the filling sets up.
Swedish Meatballs with Noodles
I first had these at a church potluck, and I’ve been hooked ever since. The creamy gravy with a hint of nutmeg makes these meatballs special and different from Italian meatballs.
I love serving them over egg noodles, which soak up all that delicious sauce. They’re tender, flavorful, and the whole dish comes together in one pan. My kids think they’re fancy, but they’re actually super easy to make. The key is using both beef and pork for the meatballs, which keeps them moist and adds more flavor.
This is comfort food at its finest. Best for Sunday dinners when you want something cozy and satisfying that feels a little special.
Serve: 4 | Prep Time: 20 minutes | Cook Time: 25 minutes | Total Time: 45 minutes
Ingredients:
- 1/2 pound ground beef
- 1/2 pound ground pork
- 1/2 cup breadcrumbs
- 1 egg
- 1/4 cup milk
- 1/4 teaspoon nutmeg
- 1/4 teaspoon allspice
- 2 tablespoons butter
- 2 tablespoons flour
- 2 cups beef broth
- 1/2 cup heavy cream
- 8 oz egg noodles
- Salt and pepper to taste
- Fresh parsley for garnish
How To Make:
Make the Meatballs – In a bowl, combine ground beef, ground pork, breadcrumbs, egg, milk, nutmeg, allspice, salt, and pepper. Mix gently with your hands until just combined. Roll into balls about 1 inch in diameter. You should get about 20 meatballs. Wet your hands slightly to prevent sticking.
Brown the Meatballs – Heat butter in a large skillet over medium heat. Add meatballs in batches, being careful not to crowd the pan. Brown them on all sides, about 6-8 minutes total. They don’t need to be fully cooked yet. Remove and set aside.
Create the Sauce – In the same pan, sprinkle flour into the remaining butter and drippings. Stir for 1 minute. Slowly whisk in beef broth, scraping up any browned bits from the bottom. The sauce will start to thicken as it heats.
Simmer Everything – Return meatballs to the pan and reduce heat to medium-low. Simmer for 10 minutes until meatballs are cooked through. Stir in heavy cream and cook for another 2-3 minutes. The sauce should be smooth and creamy. Taste and adjust seasoning.
Cook Noodles and Serve – While meatballs simmer, cook egg noodles according to package directions. Drain and add them directly to the skillet with the meatballs, or serve meatballs over noodles on plates. Toss gently to coat noodles with sauce. Garnish with fresh parsley.
Pork and Sauerkraut
This is a New Year’s tradition in my family, but honestly, it’s too good to make just once a year. The pork becomes incredibly tender and picks up all the tangy flavors from the sauerkraut.
I love how simple this recipe is with just a few ingredients that transform into something amazing. The sauerkraut mellows as it cooks and becomes sweet and savory instead of super sour. This dish is very forgiving and hard to mess up. You can use pork chops, pork shoulder, or even kielbasa.
It’s one of those set-it-and-forget-it meals that fills your house with the most wonderful smell. Best for cold weather when you want something hearty that practically cooks itself.
Serve: 5 | Prep Time: 10 minutes | Cook Time: 1 hour 15 minutes | Total Time: 1 hour 25 minutes
Ingredients:
- 2 pounds pork shoulder, cut into chunks
- 1 jar (32 oz) sauerkraut, drained
- 1 large onion, sliced
- 2 apples, peeled and sliced
- 1 cup chicken broth
- 2 tablespoons brown sugar
- 1 teaspoon caraway seeds
- 1 bay leaf
- Salt and pepper to taste
- 2 tablespoons vegetable oil
How To Make:
Brown the Pork – Season pork chunks with salt and pepper. Heat vegetable oil in a large Dutch oven or deep skillet over medium-high heat. Brown pork pieces on all sides, about 8-10 minutes total. Work in batches if needed. You want a nice golden color. Remove and set aside.
Layer the Ingredients – In the same pot, add half the drained sauerkraut. Place browned pork on top. Add sliced onions and apples over the pork. Top with remaining sauerkraut. This layering helps everything cook evenly and lets the flavors blend.
Add Seasonings – Sprinkle brown sugar and caraway seeds over everything. Tuck the bay leaf into the sauerkraut. Pour chicken broth around the edges of the pot. The liquid should come about halfway up the ingredients.
Simmer Low and Slow – Bring everything to a simmer, then reduce heat to low. Cover and cook for 1 hour, stirring once or twice. The pork should be very tender and easy to shred with a fork.
Final Steps – Remove bay leaf and taste for seasoning. The sauerkraut should be soft and sweet. If there’s too much liquid, uncover and simmer for a few more minutes to reduce it. Serve hot with the apples and onions spooned over the pork.
Chicken Fricassee
My French teacher in high school invited me for dinner once and made this dish. I was blown away by how elegant yet simple it was. The chicken pieces cook in this creamy, silky sauce that’s absolutely divine.
I love that it uses both white and dark meat, which keeps it interesting and flavorful. The mushrooms add an earthy richness that takes this to another level. This is one of those dishes that looks and tastes like you spent hours in the kitchen, but it’s actually pretty straightforward.
Serve it over rice, noodles, or with crusty bread to soak up the sauce. Best for when you want to impress guests or treat your family to something special without too much fuss.
Serve: 4 | Prep Time: 15 minutes | Cook Time: 45 minutes | Total Time: 1 hour
Ingredients:
- 3 pounds chicken pieces (mix of thighs and breasts)
- 8 oz mushrooms, sliced
- 1 onion, diced
- 2 carrots, sliced
- 3 cloves garlic, minced
- 1/4 cup flour
- 2 cups chicken broth
- 1/2 cup heavy cream
- 1/2 cup white wine (or more broth)
- 3 tablespoons butter
- 2 tablespoons olive oil
- 1 bay leaf
- 1/2 teaspoon dried thyme
- Salt and pepper to taste
- Fresh parsley for garnish
How To Make:
Prepare and Brown Chicken – Pat chicken pieces dry and season generously with salt and pepper. Heat olive oil and 1 tablespoon butter in a large skillet over medium-high heat. Brown chicken pieces skin-side down first, about 5 minutes per side. They should be golden but not cooked through. Remove and set aside.
Cook the Vegetables – Reduce heat to medium and add remaining butter. Add diced onion and sliced carrots. Cook for 4-5 minutes until onion is soft. Add mushrooms and garlic, cooking for another 3 minutes until mushrooms release their liquid.
Make the Sauce Base – Sprinkle flour over the vegetables and stir well for 1-2 minutes. Pour in white wine and scrape up any browned bits from the bottom of the pan. These bits add tremendous flavor. Let the wine reduce by half.
Add Liquid and Simmer – Pour in chicken broth and add thyme and bay leaf. Stir everything together and bring to a gentle simmer. Return chicken pieces to the pan, nestling them into the sauce. The liquid should come about halfway up the chicken.
Finish Cooking – Cover and simmer for 30-35 minutes until chicken is cooked through and tender. Remove chicken to a serving platter. Stir heavy cream into the sauce and simmer uncovered for 3-4 minutes until slightly thickened. Remove bay leaf. Pour sauce over chicken and garnish with fresh parsley.
Ham and Bean Casserole
This is ultimate comfort food that my grandmother made with leftover holiday ham. I love how the beans soak up all the smoky ham flavor and become creamy and delicious.
It’s incredibly budget-friendly since beans are cheap and a little ham goes a long way. The best part is you can make this with canned beans if you’re short on time, though dried beans do taste better. This dish gets better as it sits, so leftovers are amazing. It’s filling, nutritious, and warms you from the inside out.
My whole family requests this regularly even when we don’t have leftover ham. Best for using up that holiday ham or any time you want a hearty, no-fuss meal.
Serve: 6 | Prep Time: 15 minutes | Cook Time: 1 hour 30 minutes | Total Time: 1 hour 45 minutes
Ingredients:
- 1 pound dried navy beans (or 3 cans, drained)
- 2 cups diced ham
- 1 onion, chopped
- 2 carrots, diced
- 2 celery stalks, diced
- 4 cloves garlic, minced
- 6 cups chicken broth
- 1 bay leaf
- 1 teaspoon dried thyme
- 1/2 teaspoon black pepper
- 2 tablespoons butter
- Salt to taste
- Fresh parsley for garnish
How To Make:
Prep the Beans – If using dried beans, rinse them well and pick out any stones or debris. You can quick-soak them by boiling for 2 minutes, then letting them sit covered for 1 hour, or use canned beans to save time. Drain soaked beans if using dried.
Sauté Vegetables – Heat butter in a large Dutch oven over medium heat. Add chopped onion, carrots, and celery. Cook for 5-6 minutes until vegetables start to soften. This is called mirepoix and forms the flavor base. Add minced garlic and cook for 1 more minute.
Combine Everything – Add beans, diced ham, chicken broth, bay leaf, thyme, and pepper to the pot. Stir everything together. The liquid should cover the beans by about an inch. Add more broth or water if needed.
Simmer Until Tender – Bring to a boil, then reduce heat to low. Cover and simmer for 1 hour 15 minutes if using dried beans, or 30 minutes if using canned. Stir occasionally and check that beans don’t dry out. Add more liquid if needed. Beans should be very tender and creamy.
Final Touches – Remove bay leaf. Some of the beans will break down and thicken the liquid naturally, which is perfect. If you want it thicker, mash some beans against the side of the pot. Taste and add salt if needed. The ham is salty, so you might not need much. Garnish with parsley before serving.
Baked Stuffed Peppers
My mom made these every other week when I was growing up, and I never got tired of them. The peppers become tender and sweet while the filling stays moist and flavorful.
I love that you get your protein, vegetables, and grains all in one neat package. They look impressive but are actually super easy to prepare. You can stuff them ahead of time and just pop them in the oven when you’re ready to eat. The rice soaks up all the tomato and beef flavors while everything bakes together.
These freeze beautifully too, so I often double the batch. Best for meal prep or when you want a complete meal that looks as good as it tastes.
Serve: 4 | Prep Time: 20 minutes | Cook Time: 45 minutes | Total Time: 1 hour 5 minutes
Ingredients:
- 4 large bell peppers (any color)
- 1 pound ground beef
- 1 cup cooked rice
- 1 can (15 oz) tomato sauce
- 1 onion, diced
- 2 cloves garlic, minced
- 1 cup shredded mozzarella cheese
- 1 teaspoon Italian seasoning
- 1/2 teaspoon paprika
- Salt and pepper to taste
- 2 tablespoons olive oil
How To Make:
Prepare the Peppers – Preheat oven to 375°F. Cut the tops off the bell peppers and remove all seeds and membranes. Rinse them out well. Stand peppers upright in a baking dish. If they don’t stand well, trim a tiny bit off the bottom to make them level, being careful not to create a hole.
Make the Filling – Heat olive oil in a large skillet over medium heat. Add ground beef and cook until browned, breaking it up as it cooks, about 6-7 minutes. Add diced onion and garlic, cooking for another 3 minutes until onion softens.
Combine Filling Ingredients – Drain excess fat from the beef. Add cooked rice, half the tomato sauce, Italian seasoning, paprika, salt, and pepper. Mix well and cook for 2 minutes to let flavors combine. Remove from heat and stir in half the cheese.
Stuff the Peppers – Spoon the beef and rice mixture into each pepper, packing it down gently. Fill them generously to the top. Pour remaining tomato sauce over the stuffed peppers, letting it drip down the sides. Cover the baking dish tightly with foil.
Bake and Finish – Bake covered for 35 minutes until peppers are tender. Remove foil and top each pepper with remaining shredded mozzarella. Bake uncovered for another 10 minutes until cheese melts and gets bubbly. Let them rest for 5 minutes before serving.
Why You Should Bring These Recipes Back
These forgotten one-pan dinners deserve a place at your table again. They’re simple, affordable, and absolutely delicious. Our grandparents knew what they were doing when they made these meals regularly.
Modern cooking doesn’t always have to be complicated. Sometimes the best meals are the ones that have been feeding families for generations. These recipes prove that you don’t need fancy ingredients or complicated techniques to make great food.
Tips for One-Pan Dinner Success
Start with a good quality pan that distributes heat evenly. Cast iron and heavy-bottomed stainless steel work best. Don’t overcrowd your pan or food won’t brown properly.
Season as you go instead of waiting until the end. Each layer of flavor builds on the last. Also, resist the urge to stir constantly. Let things develop color and flavor.
Use the fond, those browned bits stuck to the bottom of your pan. They’re pure flavor. Deglaze with liquid and scrape them up to enrich your sauces.
Making These Recipes Your Own
Feel free to adjust these recipes based on what you have on hand. Swap vegetables, use different proteins, or change up the seasonings. That’s how family recipes evolve.
These dishes are forgiving and adaptable. They’re meant to be practical, not fussy. Your version might end up being even better than the original.


Leave a Reply