
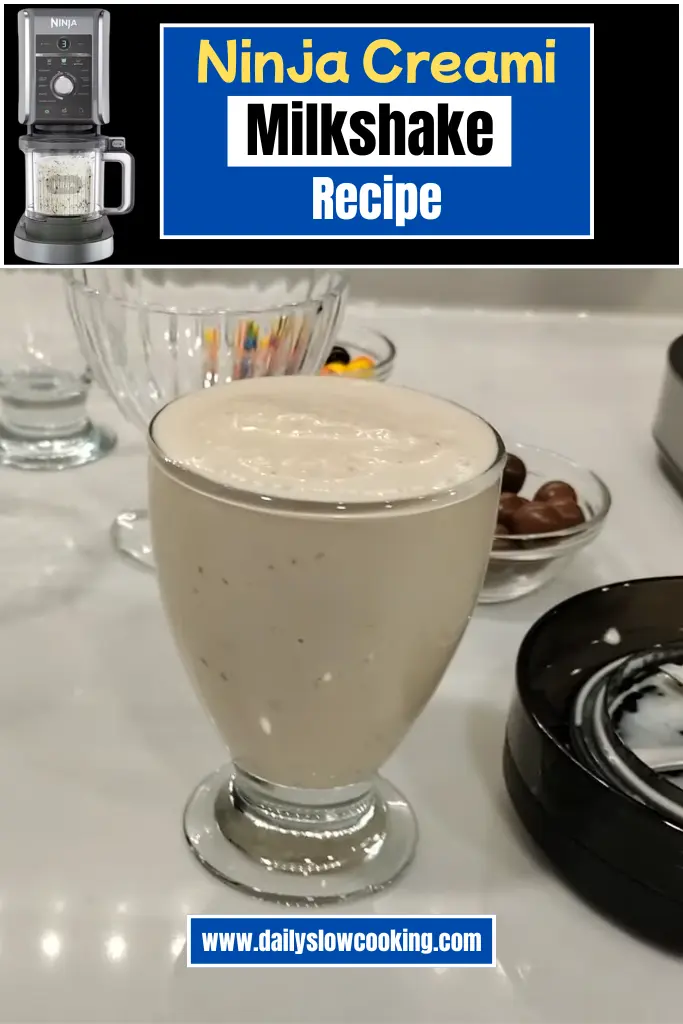
Making milkshakes at home just got so much easier with my Ninja Creami Milkshake Recipe! I love how this machine turns simple ingredients into thick, creamy milkshakes that taste better than any restaurant version.
When I first tried this recipe, I was amazed at how smooth and rich each sip was. The Ninja Creami takes all the hard work out of making milkshakes – no more blending ice cream until your blender gives up!
This recipe works with any flavor you love, and I promise your taste buds will thank you. The best part? You can make it exactly how you like it.
Trust me, once you try this easy method, you’ll never go back to store-bought milkshakes. Check out my Ninja Creami Acai Bowl Recipe for the perfect base to start with!
Why You’ll Love This Ninja Creami Milkshake
I can’t get enough of this Ninja Creami milkshake, and I bet you’ll feel the same. Here’s why it’s so awesome:
- Super Easy: The Ninja Creami does most of the work, so you just add ingredients and press a button.
- Creamy and Smooth: It blends into a thick, velvety shake that feels like a treat from a diner.
- Customizable: You can use any ice cream flavor or add fun mix-ins like cookies or fruit.
- Quick to Make: No need to freeze anything for hours; it’s ready in minutes.
- Fun for Everyone: Kids and adults love it, making it perfect for family time.
This milkshake is a game-changer because it’s so simple yet tastes like a fancy dessert. The Ninja Creami blends everything perfectly, giving you a rich, creamy texture every time.
Ninja Creami Milkshake Ingredients
Let’s talk about what you’ll need to make this tasty milkshake. I’ve kept it simple with just a few ingredients, and I’ll explain each one so you know exactly what to grab.
- Vanilla Ice Cream (1 ½ cups): I use vanilla ice cream because it’s a classic base that goes with everything. It gives the milkshake that rich, creamy texture we all love. You can use store-bought or homemade ice cream. If you want to make your own, try my Ninja Creami Chocolate Ice Cream Recipe and swap it for vanilla. Choose a good-quality brand for the best flavor, but any kind will work.
- Milk (½ cup): Whole milk makes the shake super creamy, but you can use 2% or skim if you want it lighter. For a dairy-free option, almond milk or oat milk works great. The milk helps thin out the ice cream so it’s sippable through a straw.
- Vanilla Extract (½ teaspoon): This adds a little extra vanilla flavor, making the shake taste like it came from an ice cream shop. Use pure vanilla extract for the best taste, but imitation works if that’s what you have.
- Whipped Cream (optional, for topping): A dollop of whipped cream on top makes it feel extra special. You can use canned whipped cream or make your own by whipping heavy cream with a bit of sugar.
- Sprinkles or Chocolate Syrup (optional, for topping): These add a fun touch. Sprinkles give a pop of color, and chocolate syrup adds a sweet, rich drizzle. Use them to make your shake look and taste amazing.
Helpful Swaps
If you’re missing something or want to mix things up, here are some easy swaps:
- Ice Cream: Swap vanilla for chocolate, strawberry, or any flavor you love. Dairy-free ice cream works for those avoiding dairy.
- Milk: Use almond, oat, or soy milk for a dairy-free shake. Coconut milk adds a tropical twist.
- Vanilla Extract: If you don’t have it, skip it or use a pinch of vanilla powder.
- Toppings: Try crushed cookies, caramel sauce, or fresh fruit instead of sprinkles or chocolate syrup.
Kitchen Equipment Needed
You don’t need much to make this Ninja Creami Milkshake Recipe, but here’s what you’ll want:
- Ninja Creami Machine: This is the star of the show! It blends your ingredients into a smooth, thick milkshake.
- Ninja Creami Pint Container: This is where you’ll put your ingredients for blending.
- Measuring Cups and Spoons: To measure your ice cream, milk, and vanilla extract accurately.
- Spoon or Ice Cream Scoop: For scooping the ice cream into the pint container.
- Glasses: To serve your milkshake. Tall glasses or mason jars are fun choices.
- Straw or Spoon: For sipping or scooping your shake, depending on how thick you make it.
- Optional: Piping Bag for Whipped Cream: If you’re making your own whipped cream and want to get fancy with the topping.
How to Make a Ninja Creami Milkshake
Alright, let’s get to the fun part—making your Ninja Creami Milkshake! I’ll walk you through each step so even if you’re new to cooking, you can nail this. It’s super simple and takes just a few minutes.
Step 1 | Gather Your Ingredients
Grab your vanilla ice cream, milk, vanilla extract, and any toppings you want to use. I like to set everything out on the counter so I’m ready to go.
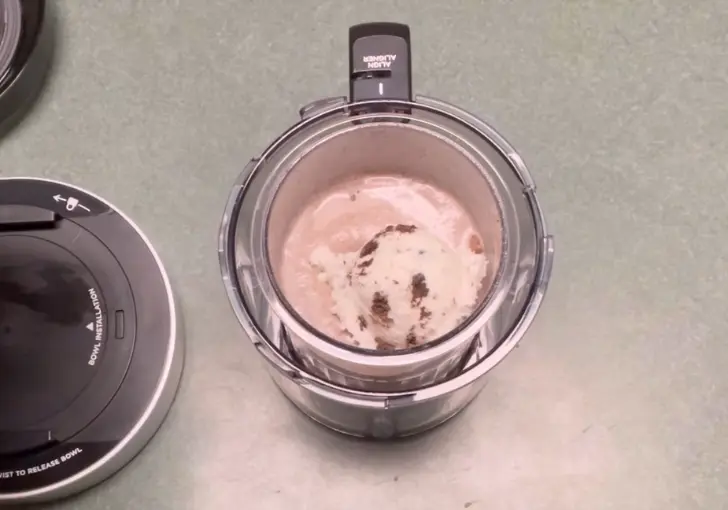
Step 2 | Add Ingredients to the Pint
Scoop 1 ½ cups of vanilla ice cream into the Ninja Creami pint container. I use an ice cream scoop to make it easy. Then pour in ½ cup of milk. Add ½ teaspoon of vanilla extract for that extra flavor boost.
If you’re using mix-ins like crushed cookies or chocolate chips, add them now (about 2 tablespoons is good).
Step 3 | Set Up the Ninja Creami
Place the pint container into the outer bowl of the Ninja Creami. Make sure it’s snug. Press and hold the paddle latch on the outer bowl lid, then slide the Creamerizer Paddle into the bottom of the lid.
Release the latch to lock it in. Line up the lid’s tab just to the right of the bowl’s handle, then twist it clockwise to lock it.
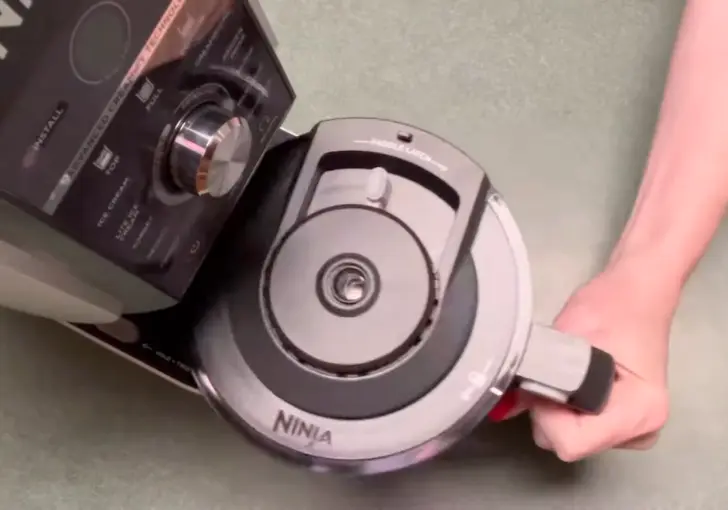
Step 4 | Lock the Bowl in Place
Plug in your Ninja Creami and set the outer bowl on the motor base, with the handle centered below the control panel. Twist the handle to the right until it clicks. This locks the bowl and raises the platform.
Step 5 | Select the Milkshake Program
Turn on the machine by pressing the power button. The One-Touch Programs will light up. Press the “Milkshake” button. The machine will start blending and stop on its own in about 1-2 minutes. You’ll see the progress bar light up as it works.
Step 6 | Check the Consistency
When the program finishes, hold the bowl release button on the left side of the machine and twist the handle back to the center to lower the bowl. Lift the bowl out, press the lid unlock button, and twist the lid counterclockwise to remove it.
Check your milkshake. If it’s too thick, add 1-2 tablespoons more milk and run the “Re-Spin” program. If it’s perfect, move on!
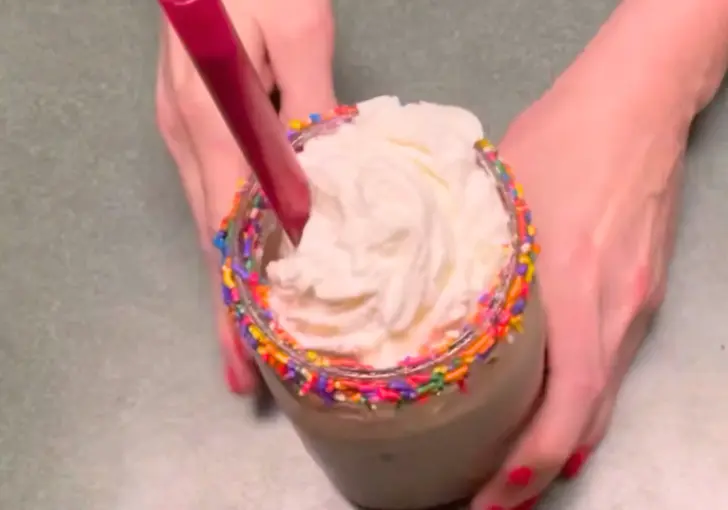
Step 7 | Serve It Up
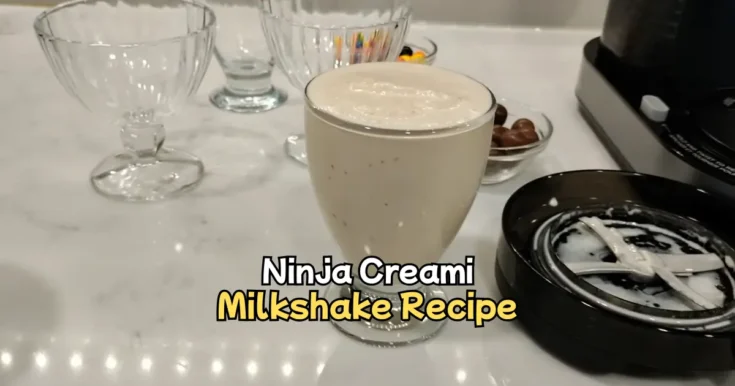
Pour the milkshake into a tall glass or mason jar. I love adding a swirl of whipped cream and a drizzle of chocolate syrup or some sprinkles on top. Pop in a straw or grab a spoon, and you’re ready to enjoy!
Recipe Tips for Success
Here are some quick tips to make your Ninja Creami Milkshake Recipe even better. These aren’t in the steps but will help you get the best results:
- Chill Your Glass: Pop your serving glass in the fridge for 10 minutes before pouring the shake. It keeps it cold longer.
- Use Cold Ingredients: Make sure your ice cream and milk are cold for the smoothest texture.
- Don’t Overfill: Stick to the MAX FILL line on the pint container to avoid spills or machine issues.
- Clean Right Away: Rinse the paddle and pint container after use to avoid sticky messes.
- Experiment with Ratios: If you like a thicker shake, use less milk (¼ cup). For a thinner one, add more (up to ¾ cup).
Ninja Creami Milkshake Serving Suggestions
You’ll want to serve this Ninja Creami Milkshake in a way that makes it extra special. Here are some fun ideas:
- Classic Style: Pour it into a tall glass, top with whipped cream, and add a cherry for that diner vibe.
- Kid-Friendly: Use colorful straws and sprinkle rainbow sprinkles for a fun treat kids will love.
- Fancy Touch: Drizzle chocolate or caramel sauce inside the glass before pouring the shake.
- Party Idea: Serve mini milkshakes in small cups for a cute dessert at gatherings.
How to Store Ninja Creami Milkshake
If you have leftover milkshake (which is rare in my house!), here’s how to store it:
Fridge: Pour the milkshake into an airtight container and store it in the fridge for up to 24 hours. Give it a quick stir before drinking, as it might separate.
Freezer: If you want to save it longer, pour it into a freezer-safe container and freeze for up to a week. Flatten the top with a spoon to avoid ice crystals. When you’re ready to enjoy it, let it thaw in the fridge for a few hours or run it through the Ninja Creami’s “Milkshake” program again for a fresh, creamy texture.
Ninja Creami Milkshake Recipe FAQs
1. Can I use store-bought ice cream for this milkshake?
Yes, absolutely! Store-bought ice cream works great in the Ninja Creami. I often grab vanilla ice cream from the store because it’s quick and tastes amazing. Just make sure it’s good quality for the best flavor. You can also use any flavor you like—chocolate, strawberry, or even cookies and cream. The Ninja Creami blends it perfectly with the milk, so you get a smooth, creamy shake every time.
2. Can I make a dairy-free Ninja Creami milkshake?
You bet! Swap the vanilla ice cream for a dairy-free version, like almond or coconut milk ice cream. Use a non-dairy milk, such as oat or soy milk, instead of regular milk. I’ve tried this with almond milk ice cream, and it’s just as creamy and delicious. You can even add dairy-free whipped cream for a fun topping.
3. What if my milkshake is too thick or too thin?
If your milkshake is too thick, add 1-2 tablespoons of milk and run the “Re-Spin” program on the Ninja Creami. If it’s too thin, add a bit more ice cream (about ¼ cup) and blend again. I like to play with the ratios to get it just right—thicker for spooning, thinner for sipping through a straw.
4. Can I add mix-ins to my Ninja Creami milkshake?
Yes, mix-ins are so much fun! You can add crushed cookies, chocolate chips, or fruit before blending. I love tossing in some Oreo pieces for a cookies-and-cream vibe. Add about 2 tablespoons of mix-ins to the pint before you hit the “Milkshake” button. The Ninja Creami will chop them up nicely.
5. How do I clean the Ninja Creami after making a milkshake?
Cleaning is easy! Rinse the pint container and Creamerizer Paddle under warm water to remove any sticky bits. You can pop them in the dishwasher, too. Wipe the outer bowl with a damp cloth. I always clean right after using it to keep it ready for my next milkshake craving.
6. Can I make this milkshake without a Ninja Creami?
Yes, you can use a regular blender! Add the ice cream, milk, and vanilla extract to a blender and blend until smooth. It won’t be quite as thick as the Ninja Creami version, but it’s still super tasty. I’ve done this when my Creami was in use, and it’s a great backup option.
Ninja Creami Milkshake Recipe
Creamy Ninja Creami Milkshake ready in 7 minutes! Blend vanilla ice cream, milk & vanilla extract for the ultimate quick & tasty milkshake recipe.
Ingredients
- Vanilla Ice Cream: 1 ½ cups (about 3 scoops or 180g)
- Milk: ½ cup (120ml, preferably whole milk)
- Vanilla Extract: ½ teaspoon
- Whipped Cream: Optional, for topping
- Sprinkles or Chocolate Syrup: Optional, for topping
- Optional mix-ins: 2 tablespoons (e.g., crushed cookies or chocolate chips)
Instructions
Step 1 | Gather Your Ingredients
Grab your vanilla ice cream, milk, vanilla extract, and any toppings you want to use. I like to set everything out on the counter so I’m ready to go.
Step 2 | Add Ingredients to the Pint
Scoop 1 ½ cups of vanilla ice cream into the Ninja Creami pint container. I use an ice cream scoop to make it easy. Then pour in ½ cup of milk. Add ½ teaspoon of vanilla extract for that extra flavor boost. If you’re using mix-ins like crushed cookies or chocolate chips, add them now (about 2 tablespoons is good).
Step 3 | Set Up the Ninja Creami
Place the pint container into the outer bowl of the Ninja Creami. Make sure it’s snug. Press and hold the paddle latch on the outer bowl lid, then slide the Creamerizer Paddle into the bottom of the lid. Release the latch to lock it in. Line up the lid’s tab just to the right of the bowl’s handle, then twist it clockwise to lock it.
Step 4 | Lock the Bowl in Place
Plug in your Ninja Creami and set the outer bowl on the motor base, with the handle centered below the control panel. Twist the handle to the right until it clicks. This locks the bowl and raises the platform.
Step 5 | Select the Milkshake Program
Turn on the machine by pressing the power button. The One-Touch Programs will light up. Press the “Milkshake” button. The machine will start blending and stop on its own in about 1-2 minutes. You’ll see the progress bar light up as it works.
Step 6 | Check the Consistency
When the program finishes, hold the bowl release button on the left side of the machine and twist the handle back to the center to lower the bowl. Lift the bowl out, press the lid unlock button, and twist the lid counterclockwise to remove it. Check your milkshake. If it’s too thick, add 1-2 tablespoons more milk and run the “Re-Spin” program. If it’s perfect, move on!
Step 7 | Serve It Up
Pour the milkshake into a tall glass or mason jar. I love adding a swirl of whipped cream and a drizzle of chocolate syrup or some sprinkles on top. Pop in a straw or grab a spoon, and you’re ready to enjoy!
Nutrition Information:
Serving Size:
1Amount Per Serving: Calories: 450Total Fat: 22gSaturated Fat: 13gCholesterol: 90mgSodium: 140mgCarbohydrates: 52gSugar: 45gProtein: 7g
Did you make this Ninja Creami Milkshake Recipe? Please leave a ⭐ rating and review!


Leave a Reply